This method statement is applicable for Installation, testing & insulation of condensate drain piping and its accessories. The scope of work covers all areas where applicable inside the buildings from hvac equipment’s and in the roof areas as applicable.
Drain piping installation shall be done as per the latest approved shop drawings for the required and applicable areas for HVAC systems.
Below is list of necessary tools for performing the site installation works.
- Mechanical toolbox
- Solvent Cement
- Deburring tools
- Measuring Tape
- Adhesive / Coating
- Cotton Cloth
- Woven Glass Cloth
- Hand Drilling Machine
- Ladders / Scaffolding
- Safety requirements tools such as safety shoes, safety helmet, safety glasses, fluorescent vest, safety gloves and dust mask as required.
Roles and Responsibilities
Project Manager
Overall responsible for project activities.
Make sure that work progresses as per planned program and all the material, tools and equipment’s to execute the works are available and in good condition.
Specific attention shall be given to all safety measures and quality control requirements in coordination with Safety Engineer and QA/QC Engineer and in line with PSP and PQP.
Coordination with client and contractors for performing the condensate drain piping activities.
Site Engineer
Implement this method of statement according to the project specifications and approved shop drawings.
Provision of all necessary information and distribution of responsibilities to his construction team.
Monitor the work progress in accordance with the planned work program and he will provide reports to his superiors.
Constant coordination with the Safety Engineer to ensure that the works are carried out in safe working atmosphere.
Continuous coordination with the QA/QC engineer for any works, and initiate the inspection request for the approval if finished works.
He will ensure the implementation of any request that might be raised by the consultant/client.
Prepare and submit daily work progress reports including the status of materials, equipment and manpower.
Engage in the routine works and check and verify daily reports received from the foremen/supervisors.
Site Foreman
Carry out the routine work and proper distribution of all the available resources in coordination with the Site Engineer on a daily basis.
Make sure that daily targets of the works are achieved and coordinated for the future planning with the Site Engineer.
Incorporate all the QA/QC and Safety requirements as requested by the concerned Engineer.
Involving and handling any type of unforeseen incident or requirement failure etc. and reporting the same to the site engineer immediately.
QA/QC Engineer (MEP)
Monitoring the executions of condensate drain piping installation works at site and ensure that it is as per the approved shop drawings and project specifications.
Ensure work inspection request are raised for the site installation activities in timely manner, inspected and approved by the consultant.
Follow and carry out all the relevant leakage tests as per project specifications and ITP.
Obtain the required clearance prior to client inspections.
Acquire any necessary civil works clearances and coordination.
Safety Officer
Implementation of all safety measures in accordance with the project HSE plan and ensure that work force is aware of its proper implementation.
To make sure that implementation of safety requirements is adequate as per risk assessment to maintain a safe working environment during the drain piping installation activity.
Routine inspection of all the site activities to make sure people are following HSE requirements.
Training the personnel in accident prevention and its proper reporting to the construction manager and the project manager.
Make sure that project site is maintained in a clean and tidy manner i.e. housekeeping.
Ensure only trained persons shall operate the power tools.
Make sure that adequate lighting is provided in the working area at night time.
Ensure high risk elevated areas are provided with suitable barricade, warning tape, safety nets, and access ladders.
Also ensure service area/inspection area openings are provided with barricade, tape, and safety nets etc.
Ensure safe access / egress to working area at all times.
Material Handling and Storage
Store keeper is over all responsible for store operations in order to make sure proper material delivery, storage and handling at the project site.
On receipt of the material at site, necessary precautions shall be taken for unloading, shifting, and storage as follows:
All material shall be stored in a place free of water, dust and adequately covered to avoid any kind of damages.
Insulation materials shall be inspected for the thickness and densities before accepting.
While unloading, shifting and storage, it should be ensured that there are no transit damages.
Any discrepancies / damage found to the materials will be notified and reported to QA/QC engineer and project engineer for further action.
Materials found not suitable for site use should be removed from site immediately.
All materials to be used shall be subject to client approvals.
Sequence of Condensate Drain Piping Installation
Obtain the civil clearance for the working area prior to start the condensate drain piping work.
All pipe work shall be installed as per manufacturer’s recommendations and approved material submittals for the condensate drain pipes.
All Condensate drain pipes inside the building shall be uPVC Class E to BS 3505 with solvent welded fittings to BS4346 (EN1452) for installation not exposed as per project specifications.
Solvent Cement jointing procedure explained below in following sections.
All condensate drain piping at roof shall be galvanized steel schedule 40, with insulation, weather proofing and metal cladding.
Installation procedure for Condensate Drain pipes inside the building (uPVC Class E):
Solvent Cement Jointing will be used for jointing the uPVC Class E pipes inside the building as below:
1. Prepare the pipe:
Before jointing, check that the pipes have been cut square and all the burrs are removed from inside and outside edges.
Remove the sharp edges from outside and inside the pipe with deburring tools.
Remove all dirt and moisture from spigot and socket.
2. Mark the insertion depth of pipe:
Mark the spigot with a pencil line at distance equal to the internal depth of the socket.
Other marking methods may be used provided that they don’t damage or score the pipe.
3. Dry fit the point
Dry fit the spigot into the socket; check the pipe for proper alignment. Any adjustments for the correct fit can be made now, not later.
4. Clean the jointing area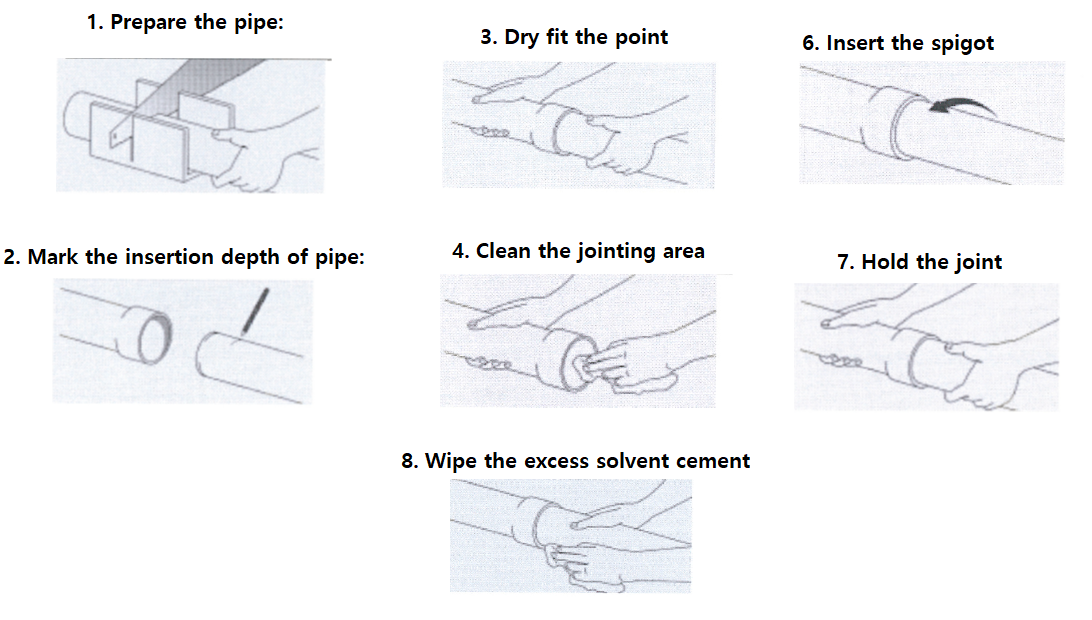
Dry, degrease and prime the spigot and socket with a lint-free cloth (natural fibers).
Cleaning solution should be applied on the jointing area for better surface preparation.
5. Apply Solvent Cement
Apply a thin even coat of solvent cement to the internal surface of the fitting socket first by using suitable sized brush.
Special care should be taken to ensure that excess solvent cement isn’t build up at the back of the socket.
Then apply a heavier, even coat of solvent cement on the spigot.
Ensure the entire surface is covered.
6. Insert the spigot
Make the joint immediately, in a single movement.
Don’t stop halfway, since the bond will start to set immediately and it will be almost impossible to insert further.
It will aid distribution of solvent cement to twist the spigot into the socket so that it rotates about a ¼ turn whilst (not after) inserting, but where this cannot be done, particular attention should be paid to uniform solvent application.
7. Hold the joint
Hold it against movement and rejection of the spigot for a minimum of 30 seconds.
Disturbing the joint during this phase will seriously reduce the strength of the joint.
8. Wipe the excess solvent cement
For a neat professional joint, with a clean rag wipe off excess solvent cement immediately from the outside of the joint.
9. Do Not disturb the joint
Make sure to not disturb the joint for 5 minutes or do not rough handle it for at least 1 hour.
Also don’t fill the pipe with water for at least 1 hour after making the last joint.
Don’t pressurize the line until fully cured.
10. Cure the joint
The process of curing is a function of temperature, humidity and time.
Joints cure faster when the humidity is low and the temperature is high.
Precautions to achieve an effective joint
- Make sure that the end of each pipe is square in its socket and in the same alignment and grade as the preceding pipes or fittings.
- Create a 0.5mm chamfer, as a sharp edge on the spigot will wipe off the solvent and reduce the interface area.
- Do not attempt to joint pipes at an angle.
- Curved lines should be jointed without stress, and then curved after the joint is cured.
- Support the spigot clear of the ground when jointing, this will avoid contamination with soil or sand.
- An unsatisfactory solvent cement joint cannot be re-executed, nor can previously cemented spigots and sockets be re-used.
- To repair a joint, cut out the defected joint and make a new joint.
Pipework will be adequately supported in such a manner as to permit free movement due to expansion and contraction as per manufacturer recommendation and project specs.
Pipework should be graded to fall throughout, run to waste and should also be fitted with nearest cleanable traps.
Gravity drains will be installed whenever applicable.
After the completion of condensate drain piping gravity test must be carried out as per the specification requirements.
Marking shall be placed at each side of any wall, partition or floor, at 10m intervals on all exposed piping.
Installation and Insulation of Condensate Drain Pipes (in the Roof Area):
Make sure that all the installation for the pipes in the roof area shall be done as per approved shop drawings, material submittals and specifications.
Make sure to obtain civil clearance for all work in the roof area before starting the drain piping installation.
Ensure that pipes runs with no clashes with other services.
By means of string and chalk lines the actual pipe layout will be marked/identified, so as to allow for the installation of pipe supports and anchors.
Condensate drain pipework will slope towards the drain discharge point, when using a spirit level a turn of the bubble shall be adequate to identify the correct slope.
At discharge points either directly above the funnel drain on the grey water system or sump pit, the condensate discharge shall be visible, i.e. drain line and funnel will not be directly connected.
All tee’s will be of the same size as the pipes connected to them.
Reductions will be made by means of straight through reducing sockets; reductions on bends by bushes will not be used.
Supervisor to ensure that where pipes cross construction expansion joints ‘bellows’ type expansion joints are installed in the system, as detailed on the construction drawings and in accordance with technical submission reviewed by consultant/client.
All pipework systems shall be provided with adequate removable sections to assist cleaning and for ease of maintenance operations.
Supports will be arranged as near as possible to pipe joints and also in the case of change in directions.
Ensure that leakage test has been done as per mentioned in below section for testing of the condensate drain pipes.
GI PIPES JOINTING METHOD
Pipe ends will be threaded by the use of an appropriate threading machine.
The machine die head will be suitable to cut tapered type threads.
Threads will be cut to the correct thread length.
After the suitable thread has been cut, burrs, surplus oil and swarf will be removed prior to the selected fitting being screwed in place.
Threads shall be applied with thread joint compound of the approved type.
By means of an appropriate pipe wrench, the selected fitting will be screwed onto the pipe thread to the correct tightness required without causing any damage to the pipe/fitting.
When pipe and fitting is fully tightened, clean of any excess jointing compound, and paint exposed threads with approved galvanizing compound.
Testing of the pipes:
Plug the drain pipe from lowest or drain point and fill the drainage piping network from highest point or through the tray of the highest FCU unit in case of more units connected to one network.
Once the pipes are filled completely keep the water in the system up to 4 hours or as advised by consultant/client.
Observe any leakage on joints.
If no leakage is observed means the piping is OK.
Now submit request for consultant approval and witnessing inspection.
Insulation of the Condensate Drain pipes:
Insulation of the Pipes will be done as per manufacturer recommendation and as per project specifications.
Condensate drain pipework shall be insulated with rigid fiber glass (K450) KIMMCO with 25mm Thick, 64kg/m3 as per manufacturer recommendation.
All insulated pipework installed on roof and exposed in any area shall be cladded with plain aluminium sheets at least 0.7mm thick.
Raise work inspection request for witnessing and approving the insulation work by consultant.
Related Documents:
- Quality Control Procedure
- Inspection & Test Plan
- Check List for condensate drain piping installation
- Check List for Leakage Test
- Risk Assessment
- Manufacturer recommendation for Installation of the Condensate drain pipes.
- Manufacturer recommendation for Insulation of the Condensate drain pipes.
Discover more from Method Statement Store
Subscribe to get the latest posts sent to your email.