The purpose of this plumbing method statement is to define the task and introduce correct practices in order to ensure that the drainage piping job execution will meet the project requirements under the safe system of work. Procedure covers both metallic and non metallic drainage piping installations.
Before starting the drainage installation work arrange necessary materials, tools and equipment i.e.:
- Cast iron pipes & fittings
- UPVC pipes and fittings
- Repair Paint for pipes
- Support & Hangers
- Drilling machine Drainage Construction Procedure
- Pipe Cutter (Disc cutter / Hacksaw)
- Screw driver
- Tool Box
- Measuring tape
- Spirit Level
Relevant References and Standards
- Drainage Shop Drawings
- Technical Specification
- Project Quality Plan
- Material Submittal Approval & Installation Guide Line
- Local and International plumbing standards
Pipes Storage and Handling
Pipes and fittings shall be transported to the site by the contractor in appropriate vehicle such that no damage is done during transportation.
The pipes should be evenly supported throughout their length. Pipes should be handled with care, make sure they are not dropped on hard surfaces, rolled on the ground or dragged.
Where possible, drainage pipes should be unloaded by hand, incase mechanical lifting equipment is to be used, web slings are preferred as they do no gouge or scratch the surface of the pipes.
The storage area must be flat, the ground must not be marshy or unstable and it must not contain any corrosive material.
While loose pipe shall be stacked on a clean, flat surface, free of sharp projections and other sources of point loading, the pipes must be stacked in the respective stakes according to diameter in accordance with a logical plan.
The same is applied for fittings and accessories. Pipes & fittings should not be exposed to prolonged solar radiation and covered from direct sunlight. Store all fittings in their original packaging until required for use, in well ventilated, shady conditions and do not expose to direct sunlight.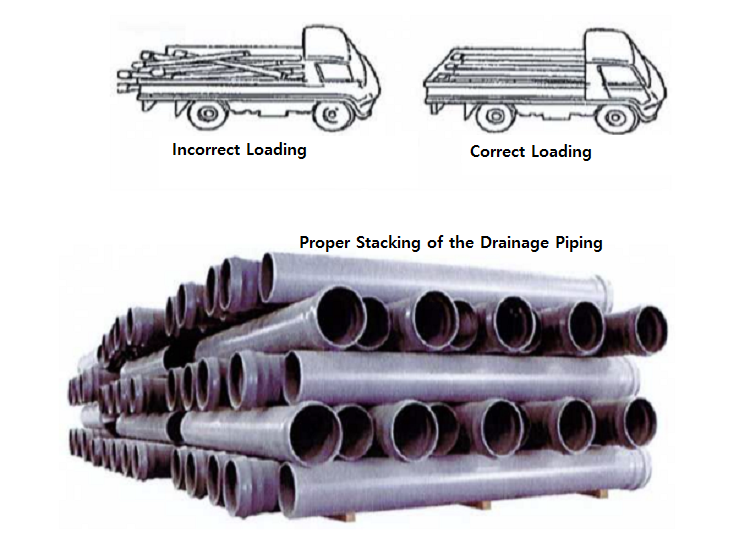
Couplings should be stored in cool area protected from light, direct sun light and strong artificial light with a high ultraviolet content.
The pipes should be stacked as per recommended manufacture instruction to avoid over stress and possible damage. All the used material should be as per approved material submittals and approved area of application as indicated in the project documents.
Receiving Inspection of Drainage Pipes
Upon receipt of materials on site, the Storekeeper and Site Engineer or their representative will have to check to ensure that the materials delivered and their respective quantities are correct.
A Material Inspection Request shall be issued and all materials must be inspected and verified by the consulting engineer.
Once approved, the materials will be considered correct with respect to their approved sample(s), catalogues and technical reports etc.
General Drainage Installation Requirements
Drainage pipe layout shall be as per the approved shop drawings and the drainage pipe installation shall be planned in advance to match with the main contractor’s program of works.
All materials and tools to be kept ready on site prior to start the installation works, materials will be visually inspected before installation to make sure it is undamaged.
Project specification, standard codes, and work procedures shall be followed for all steps.
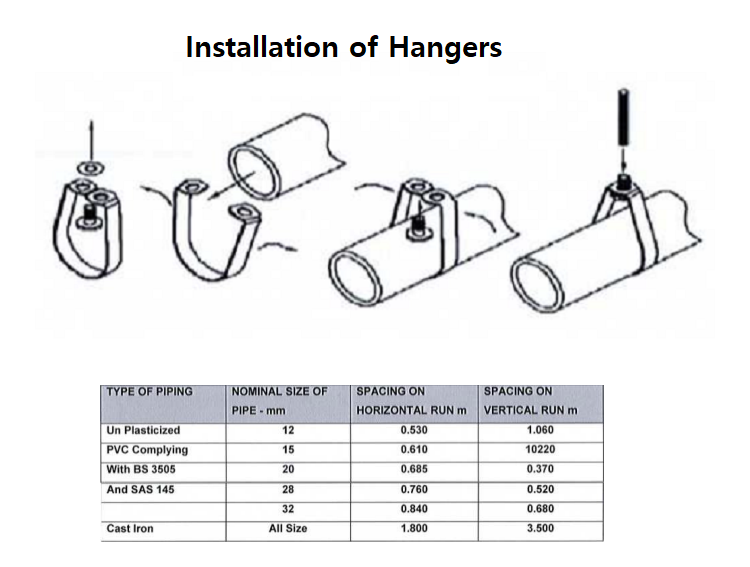
Pipes shall be supported adequately using approved hangers & supports, at maximum support spacing of 1.8 m for horizontal pipes & 3.5 m for vertical pipes for all pipe sizes as per project specifications, if necessary site fabrication/modification shall be allowed as per applicable standards and as per client approvals.
Any deviations to the layout shall be subject to approval of coordination drawings as per consultant requirements.
Piping shall be installed at appropriate slopes, free of sags and sharp bends, as per the approved shop drawings.
Throughout the installation process the open ends of pipes shall be protected to avoid the entry of debris etc.
Use required fittings such as ring seals which are necessary and mandatory to accommodate the expansion and contraction action as per project Specification and drawings.
Rubber Socket with clamps, Flanges, Dielectric Union etc. joint to be used as required to connect the cast iron and upvc pipes as per project specifications and drawings.
Where the drainage pipes are crossing the fire rated walls, floors or roofs; approved fire stopping material shall be used to fill the annular space between the pipe surface and sleeve.
The method of firestop application shall be as recommended by the approved fire stopping material manufacturer. The fire sleeve shall have a fire rating compatible to the fire rating of wall, floor or roof being crossed.
Drainage Pipe Installation Sequence of Work
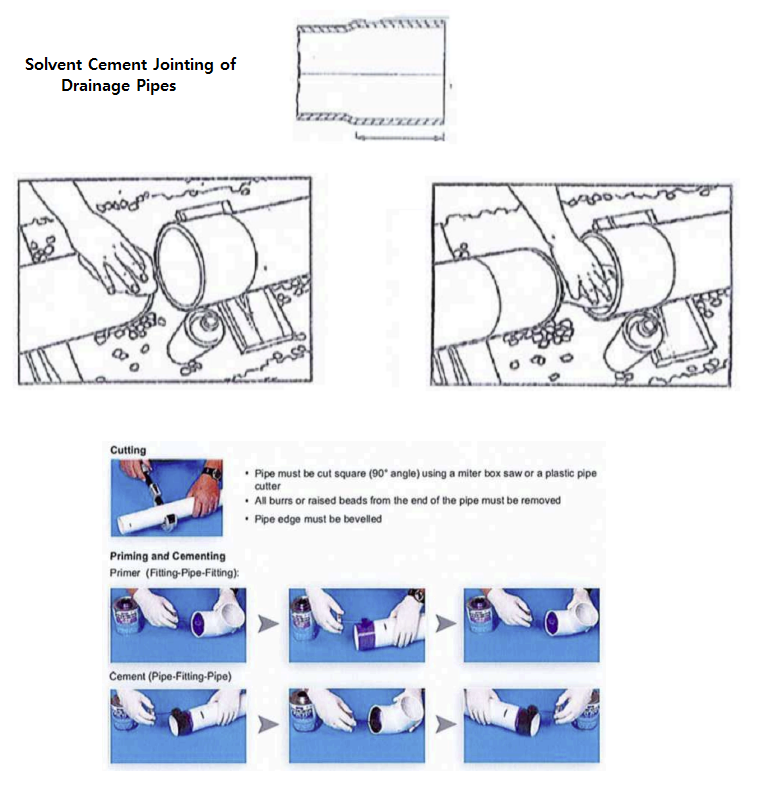
Pipe Cutting: Pipes shall be cut on site using disc-type cutter or by other cutting tools. The pipe must be cut square (90 angel), this can be done easily by wrapping a metal sheet around the pipe with no overlap on the edges, marking around the pipe and cutting along the marked line.
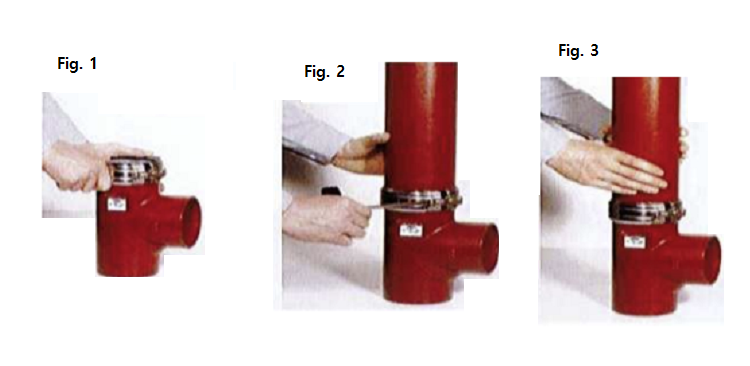
Assembling as a Sleeve:
Push the supplied assembled coupling onto the pipe spigot so that it abuts on the central register of the elastomeric gasket. (See Fig.1)
Push the next pipe spigot into the other end of the coupling. (See Fig. 2).
Tighten the screw to “null gap” position with screwdriver. (See Fig. 3).
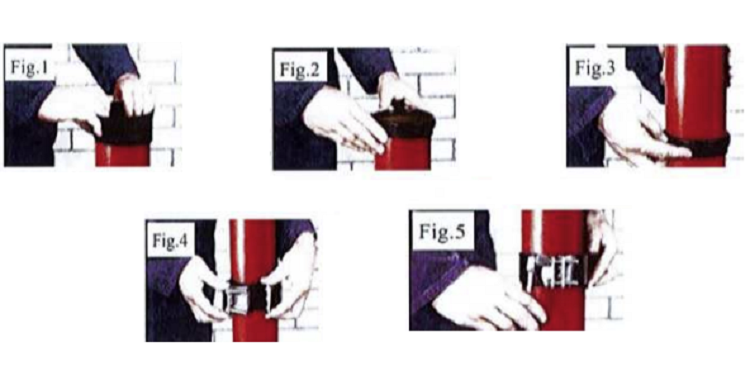
Assembling as Separate Assembly:
Push the supplied sealing gasket on to the pipe spigot so it abuts the gasket central register (see Fig. 1).
Roll back the open half of the sealing gasket (see Fig. 2).
Install the next spigot and unfold the gasket half back (see Fig. 3)
Place the steel strap around the sealing gasket (see Fig. 4).
For couplings with two screws, alternately tighten the two tightening screws uniformly and hand tight. The threaded plates must come together parallel to avoid any deformation.
For single screw couplings, tighten the single hexagon head screw (see Fig. 5)
Installation of Grip Collars
Grip collars shall be installed around the coupling to secure the couplings unspecific cases like changes of direction, gradient or some components like branches and plugs, where the junctions exposed to the excessive pressure undergo end thrust forces that have to be addressed.
Position the two half parts of the PAM grip collar uniformly so it encircles the pipe in parallel.
The grip collars must be positioned so that the apertures fit over the fixing bolts of the coupling and the teeth are directly located onto the pipe.
Insert the four screws to fix the two parts together loosely.
The positioning must be cautiously made, so that the grip collar windows are not seated on the clamps of the coupling and the claws are not swatting the coupling strap.
Tighten the screws crosswise alternatively so that the two plates are put in parallel with the same spacing.
Now the assembly is completed when the external edges of the plates are in contact on both sides.

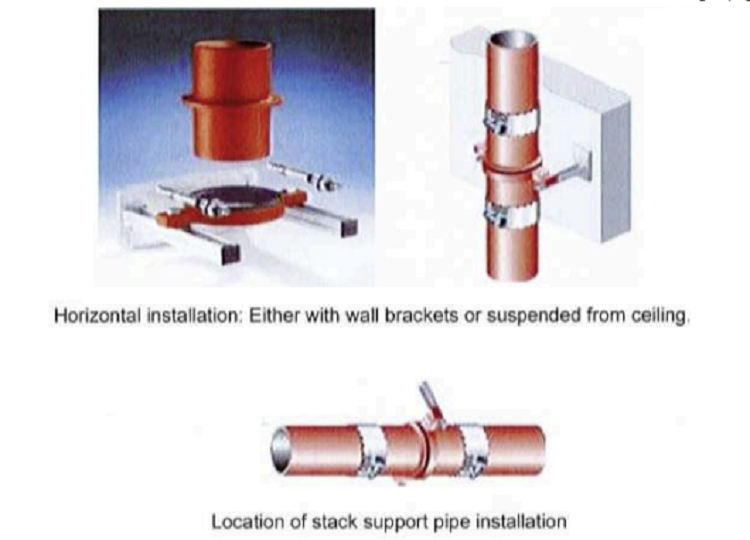
Installation of Stack Support Pipes:
Vertical installation: Either on cantilever arms or stack support consoles.
Shall be installed at the base of every Soil, Waste & Vent Stack and where end thrust forces occur as shown in drawings / details.
Pipe Hanger Installation:
Location of the hanger to be marked as per approved shop drawings, and specifications.
Install drop-in anchor.
Install the pipe either by screw fitting or coupling.
Select the hanger based on the pipe size. Install the hanger rod to the drop in anchor.
Install the hanger to pipe and hanger rod.
Tighten the bolt and nut holding the hanger rod and hanger evenly.
UPVC Drainage Piping Installation Method
110mm dia. to 315mm dia UPVC pipe and fittings shall be installed as per SAS14 Class3.
90mm dia pipe work and below shall be installed as per SAS14 Class 4.
Jointing of pipe work and fittings shall be by the use of solvent weld sockets carried out in accordance with manufacture instructions.
Solvent weld cement shall be of a type approved by the manufacture of pipe work being jointed.
After getting the all civil clearances (including Raft Slabs , levels, blinding, water proofing & steel fixing), prepare the pipe length & all accessories as per the approved shop drawing for the laying where applicable.
Proceed with pipe Installation with the appropriate Slope and Route as per the approved Shop Drawing using suspended supporting system as per the project specification.
Measure length of pipe required, making due allowance for any pipe fittings to be used. Cut the pipe to the measured length. Ensure that the ends are cut square and clean all burs. A chamfer to the depth of half wall thickness to be applied to each spigot.
The spigot and socket to be jointed should be carefully examined for any damage which could impair the jointing procedure.
Spigot insertion depth should be measured as the depth from the mouth to the shoulder of the socket.
The insertion depth should be marked on the spigot using marker.
This method of joining is very simple and reliable if it is followed correctly, but any deviations from the recommended basic steps may reduce the strength and integrity of the joint.
The manufacturer procedures for preparation, insertion, and curing should be followed.
Leakage test to be done in order to ensure there is no leakage from joints & pipes.
On completion of the drainage pipe installation works, relevant section shall be visually inspected to ensure that the correct installation procedures have been followed, and that the pipes and fittings are adequately restrained and supported, as per the project plumbing specifications.
This article covered different topics for drainage installation i.e. the Installation of Drainage Piping System | Drainage System in Plumbing | Drainage Pipe Installation Guide | How to Install Drainage Pipe | Drainage in Plumbing | Drainage Construction Procedure | House Water Drainage System | Safe Work Method Statement for Plumbing| Installing a Drainage System in your Yard
Discover more from Method Statement Store
Subscribe to get the latest posts sent to your email.