The scope of this procedure comprises the control of waterproof membranes installation and application on flat and inclined substrates.
The condition and moisture content of the substrate will be inspected and accepted by the subcontractor before commencement of waterproofing works on site.
A meeting will be held with specialist subcontractor to discuss the scope, sequence of work and inspection requirements.
Materials will be stored in accordance with the recommendations of the manufacturer especially volatile and limited life liquids.
All surfaces will be dry and free from dust and loose material by using the compressed air or vacuuming, prior to application of the roof water proofing membrane.
Any foreign matter such as oil, grease etc. or protrusions such as nails, concrete fins etc. will be removed to ensure a good bond and water tightness.
Primers, liquid membranes, bonded and unbonded sheets will be laid strictly in accordance with the manufacturer’s instructions, using laps, fillets and flashings as specified.
All the work areas will be subject to controlled access to ensure availability of roof and to prevent damage to the waterproofing membrane.
Following the installation of the water proofing membrane, suitable temporary protection board or permanent installation will be laid as required by the specification and good practice to provide protection against damage to the membrane while the other trades perform their operations.
The waterproofing subcontractor will submit a requisite guarantee for the waterproofing system against leaks. The guarantee shall be in the name of the Client and shall commence from the hand over date of the building.
A flood test will be applied, if specified. Repairs will be carried out until a waterproof condition is accepted.
The installed membrane will not be overlaid with permanent covering until it conforms to the specified requirements.
Inspections of installation and material will occur as per below Check Sheet for Roof Water Proofing.
- Condition of roof and moisture conditions accepted by subcontractor.
- Roof area cleared of loose material, projections and oil etc.
- Roof area isolated for membrane installation.
- Primer laid in accordance with instructions.
- Liquid membrane sheeting laid in accordance with manufacturer’s instructions (including bonding where specified).
- Spot checks on laps, fillets and flashings.
- Flood test carried out?
- Final inspection before boarding or Screeding (including separation sheet)
- Check guarantee in place.
Waterproofing Method Statement for Concrete Roof Slab
Below is a brief method statement that covers the application of polymer modified bitumen liquid membrane (Sika Products) with cement screed for non-insulated roof slab.
The contractor to arrange mixer for cement-sand mortar and all other tools or equipment for waterproofing work where necessary.
Below is list of materials that shall be needed for this work.
■ Cement: PC or PCB 40
■ Sand: sieved to remove all particles > 5 mm and impurities.
Sika products
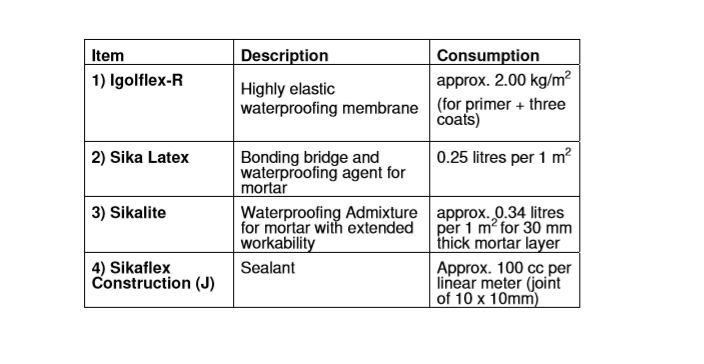
■ Igolflex-R: highly elastic bituminous waterproofing liquid membrane
■ SikaLatex: is a modified Stryrene Batdiene emulsion to be mixed with cement (neat) or cement/ sand mortar for improved adhesion and water resistant properties.
■ Sikalite: waterproofing admixture for mortar with extended workability.
■ Antisol E or Antisol S: curing compound applied to the Sikalite mortar.
■ Sikaflex Construction (J): 1-component polyurethane based elastic sealant used to seal expansion joints when the roof slab dimension exceeds 3.0 m.
■ Sika Primer 3: used as a bonding bridge between the concrete substrate and the polyurethane joint sealant.
Surface Preparation for Waterproofing
All weak and unsound concrete must be removed by mechanical means and repaired to give an even surface.
The concrete must be clean and free from dust, oil, or any laitance or loose materials and must be dry prior to the application of the IgolflexR.
Existing concrete roof slab to which the waterproofing layer is to be applied should have strength of not less than 25 MPa.
Falls of roof and drainage: Falls of roof and drainage shall be even and with minimum slope of 1 : 100. If the slope will be constructed after finishing concrete work then this must be done using cement mortar comprising of 1 part of cement and 3 part of clean coarse sand (by weight) and Sikalite 1% to 2% of weight cement to provide a even surface with minimum thickness of 15 mm and maximum thickness per layer of application 40 mm; other wise do it layer by layer.
Angle fillets/chamfer: Angle fillets shall be provided to all internal angles and these should be constructed using SikaLatex mortar as used in slope construction.
Cracks: Non-moveable /dead cracks with width of crack larger than 1.0 mm must be repaired using following method.
Hack a “V” shape with width approx. 25 mm and depth at least 12 mm – Mix 1 part of Sika Latex, 1 part of water and 3 part of cement.
Brush evenly this bonding agent onto concrete substrate.
Whilst its still tacky apply Sika Latex mortar thoroughly to provide smooth finished surface.
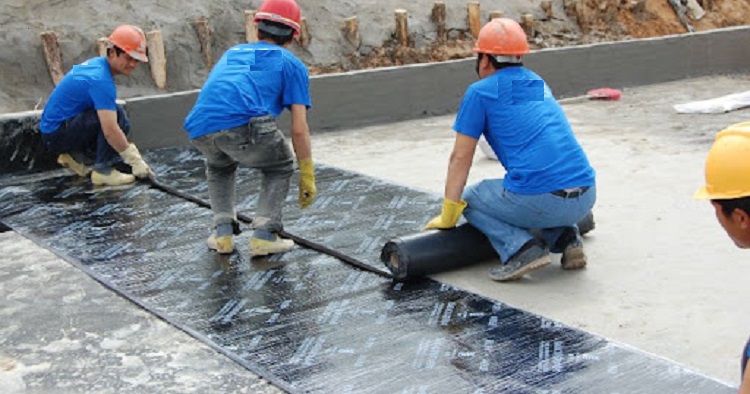
Waterproofing Application Procedure
Apply the primer coat of Igolflex-R (diluted with 20-50% water) on to the dry, clean concrete substrate with brush or spray.
The rate of application should be 0.2 – 0.3 kg/m2 for the primer coat.
In case of absorbent substrates prewet the surface with clean water.
Allow the primer coat to completely dry (approx. 2 hours, 30 °C) then apply a heavy brush the 1st coat of undiluted Igolflex-R with consumption of approx. 0.6 kg/m2
Note: At angles, corners and when the concrete substrate was presenting dead cracks, it is recommended to install an open woven bitumen bonded glass fabric with overlapping edges at least 50mm. the fabric shall be installed onto the dry but still tacky 1st coat of undiluted Igolflex-R.
Apply the 2nd and 3rd coat of Igolflex-R (undiluted) with the consumption of approx. 0.6 kg/m2. Wait approximately 2 hours between coats.
The Sikalite mortar should be applied to the top of Igolflex-R after minimum waiting time of 2 hours or until Igolflex-R completely dries.
But before apply Sikalite mortar should be applied Sikalatex Boding agent (1part of Sikalatex , 1part of water and 4 part of cement). Sikalite mortar have to apply immediately on Sikalatex bonding agent or when it still wet.
The preferred finish to the Sikalite waterproofing mortar is by power float. If power floating of the surface is not possible the surface should be thoroughly worked with steel trowels.
On completion of the finishing of the Sikalite mortar, the surface should immediately be sprayed with either Antisol S or Antisol E (where subsequent surface treatments will not be required).
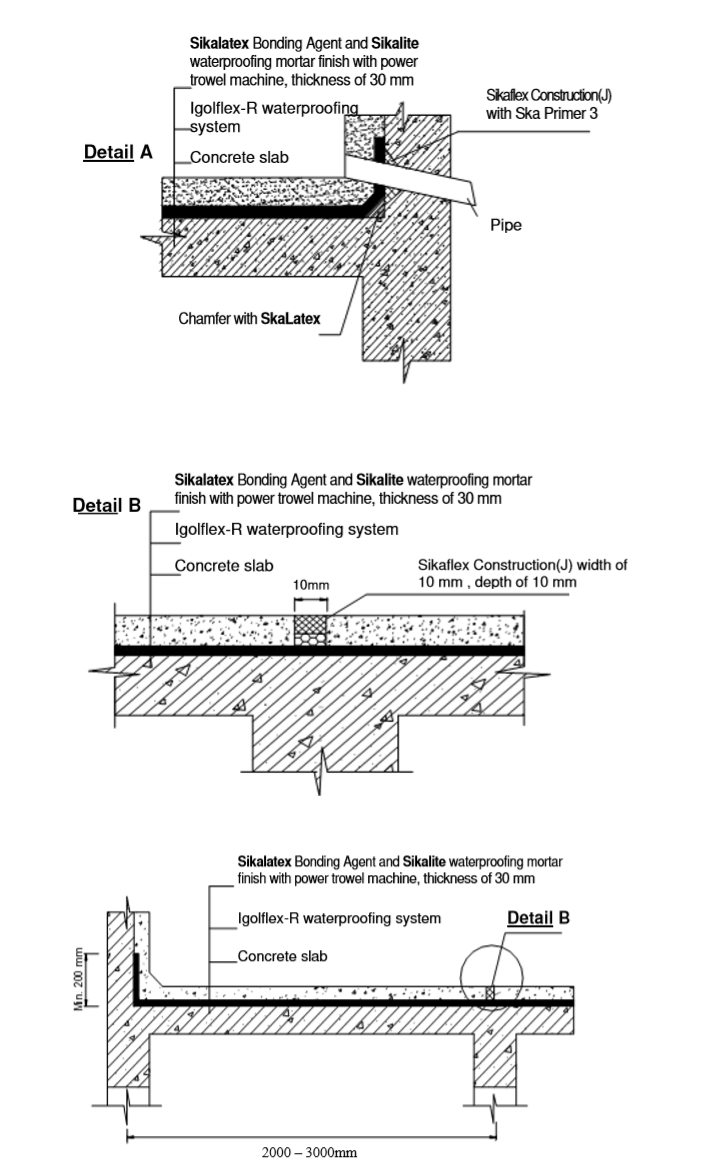
Necessary Details
Expansion Joint Configuration (Detail B)
In order to allow for thermal expansion and contraction, 10mm wide expansion joints are required every 3.0m i.e. the maximum size of the Sikalite mortar “bay” is 3.0m x 3.0m with thickness approx. 30 mm.
Insert backer rod or foam rubber material into the joint such that the remaining recess to be filled with Sikaflex Construction (J) is approx. 10mm x 10mm (refer Detail A).
Sika Primer 3 is then applied to both vertical edges. After 1-2 hours the Sikaflex Construction (J) is applied as per the instructions given in the technical data sheet.
Note: it is recommended to apply the sealant when the ambient temperature is falling
Pipe Penetrations ( Detail A)
If the PVC pipe has previously been installed, chip a recess (approx. 10x10mm) in the concrete around the pipe.
Apply Sika Primer 3 to both the cleaned concrete surface and the cleaned surface of the pipe.
After 1-2 hours the Sikaflex Construction (J) is applied as per the instructions given in the technical data sheet.
Summary of Sika Products Consumption
Discover more from Method Statement Store
Subscribe to get the latest posts sent to your email.