This procedure covers the methodology to be followed for carrying out plastering in line with the approved technical project specifications.
Project site manager will provide inputs as per the project execution plan to ensure that lifting strategies & philosophy are addressed, and is responsible for the overall management of the project construction team to ensure that safe and effective operations are conducted and properly documented.
Equipment manager will be responsible for the transporting equipment’s and availability in good order.
Site engineer shall be responsible for planning, execution and implementation of all site activities related to this procedure.
Supervisor shall be responsible for execution of construction activity, also prepare daily site construction records.
QA/QC shall be responsible for attending all inspection stages as required by inspection and test Plan, he shall be responsible of performing all checks and shall prepare necessary Inspection Reports.
HSE Requirements for Plastering Works
HSE engineer/inspector shall be responsible for overall control and inspection of HSE issues on the site during the plastering activities.
Use double scaffolding always and ensure the scaffolding is adequately braced with the permanent structure, for working in heights.
Ensure the workers use safety appliances like safety belts in height, helmets, safety goggles while carrying out chipping, plastering and pointing in heights.
Make sure the working area is kept clean for easy access and protect edges of opening by barricading while working.
Ensure the area of working is well lighted (provided with lights) so that work area is easily accessed and moved around safely by workers.
Inspect the scaffolding before starting the plastering work at height.
For the access platform/working platform double hand railing to be provided.
Proper illumination to be provided during the work, as required.
Educate the workmen through pep-talk meeting.
Furthermore the safety matters shall comply to project Health and Safety Plan.
Necessary Tools & Equipment
Below is list of mandatory tools and equipment that shall be available for plastering works.
- Corner trowels
- Spirit level
- Scraper
- Claw hammer
- Float
- Nail
- Grinder for block cutting
- Scaffolding platform
- Electric drills
- Trowels and hand tools
- Spade
- Wheel barrow
- 3m long aluminum straight edge
- Mason square
- Measuring tape
Preparatory Works Before Plastering
Complete all internal / external works like:
Filler walls in structural frame work
Fixing frames of doors, windows and ventilators
RCC pre-cast jali works,
Fixing and concealing all kinds of pipes (getting concealed in the walls)
Complete all pipelines works to their final positions and levels for Water supply lines, Sewer pipelines, Telephone conduits, Electrical conduits, TV Antenna lines & piping work for other services if any coming on wall surfaces to be completed with their hood covers fixed and finished to the final surface level of the walls / ceilings.
All lightning protection system and earthing to be completed.
Surface Preparation:
Do prepare the surface to be plastered by:
Clearing all dirt and loose matter
Chipping and clearing of mortar dropping.
Chipping and clearing of unevenness in the masonry, concrete works in ceiling and walls of rooms.
Chipping and clearing the debris in areas of skirting and dado after marking the cutoff levels clearly.
Raking out joints if necessary for proper keying
Concrete Surface Preparation
Prepare the surface of concrete members by:
Hacking at close intervals (50 to 70 mm center to center) with bush hammer or with a chisel and hammer and then wash it thoroughly with water.
This will roughen up the concrete surfaces and ensure a good bond is provided for the plaster.
Fresh concrete surfaces are to be roughened with a heavy wire brush or a special scouring tool.
Note: Form work for concrete meant to receive plaster, should preferably not be given any oil coating, as these are likely to remain on the concrete, interfering with bonding of the plaster. Care must be taken to remove the oil coating, before plaster is applied.
Preparing the Brick / Block Masonry Surfaces
The surface should be hard, rough and clean.
Joints should be raked 10mm deep and splashed with water.
It may be desirable to rough the surface with pick or a similar tool, if the surface of stone in stone masonry is smooth, splash with water, allow to dry before plastering is taken up.
Fix in position button marks at a spacing not more than one length of the straight edge (viz 1.2m or 1.5m as the case may be for the entire surface to be plastered).
Check thoroughly all button marks for the thickness whether it is as per specification. In case the thickness is more, do carry out the making up coat well in advance and scratch the
surface rough to receive plaster. Similarly when thickness is less, do carry out chipping where required, so that minimum thickness of plaster is available at all places.
Fix in position all plastering accessories like:
Chicken wire mesh in joints.
Edge guards, edge stoppers, corner angles, corner beads etc,
Panel dividers, pattern marking on the wall / ceiling surfaces.
Fix erect scaffolding system in advance so that it can be used for survey work, surface preparation, carrying out plastering, curing.
Mortar Preparation for Plastering
Light the area well in advance where plastering and mortar mixing is happening.
If mortar is to be prepared manually, the mortar for plastering has to be prepared on a firm, neatly finished platform surface or on metal sheets only.
A small capacity mechanical mortar mixer can also be used.
The sand has to be sieved for proper gradation.
The sand has to be washed to remove impurities like mud, if required, and sufficiently dried before plastering work is taken up.
In case wet sand is to be used, check for quantity of water in mortar and allow for bulkage of sand while mixing to get consistency of mortar.
For stucco plastering, aggregate to be thoroughly washed sieved, handpicked to remove unwanted colored aggregates, flaky particles, which when used will spoil the quality of plaster.
Prepare the mortar in clear area in proportion as specified.
Mix mortar in a number of batches, a batch being the quantity (or volume of mortar), which can be consumed with in next 2 hours.
Add water to the dry mix of sand and binder (not other wise).
If specified in the contract, do add the admixture to the mixed mortar and mix again thoroughly.
Mix proportion required is 1:4.
Plastering Method Statement
The sequence of plastering work procedure shall be as under:
Wet the surface to receive plaster one hour before, so that while starting plastering, the surface is skin dry.
Ceiling plaster shall be completed before commencement of wall plaster.
Plastering shall be started from the top and worked downwards to the floor
Throw the mortar for an area coverable by the straight edge, both vertically and horizontally in one stretch.
Level the surface using the straight edge.
Float the surface and finish as per specification.
Repeat this operation for the entire area in stages.
While proceeding with the work, do float and finish the joints in one stage and then in subsequent stages properly. This is to ensure that the stages, in plastering work, is not apparently visible.
Intermittently do check the surface for plumb, line and level and make up all deficiencies.
Provide 15 mm thick single coat plaster in internal and external surfaces of concrete and masonry wall as specified.
Trueness of plastered surface when checked with the straight edge of 2 meter length shall not be greater than 4mm at any place.
Plaster Quality Control Requirements
Important quality control measures to be observed:
Check thoroughly before and immediately after plastering, the line and levels.
Check thoroughly before and immediately after plastering, the surface areas for unevenness, surface blemishes etc. so that all rectification (if required) can be carried out with in the final setting time, with out much additional costs.
Clean the floor area where plastering is to be taken up, to ensure plastering remains to quality (without dust settling on wet surface).
Cure the plastering well for required number of days.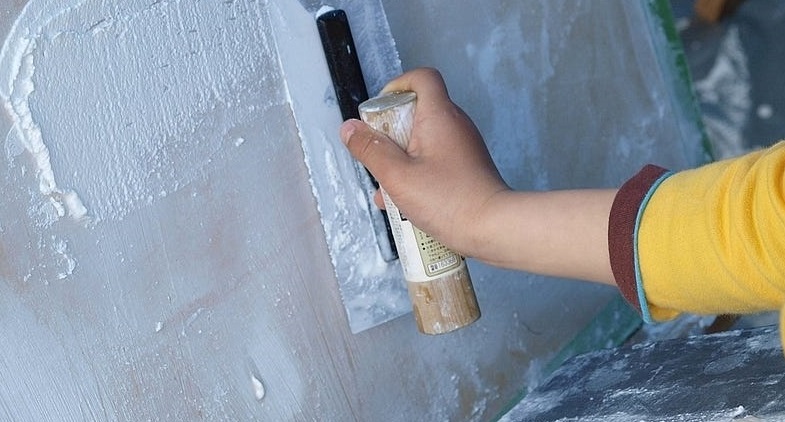
Restrict the access to area where plastering is complete (This will ensure better protection of edges, corners, angles etc.).
Finish the plaster touch up works near the skirting, after skirting and dado works are completed. Also Do ensure a neat work is done.
Ensure all touch ups are done neatly after pre-cast slabs are embedded in position, working platforms are inserted in position, and sanitary fixtures are fitted (merging the surfaces being touched up with original surfaces).
While stopping the work for the day, do ensure the surface end line is cut inclined at 45 degrees or 60 degrees. When starting the work next day, join the new plastering and old plastering with neat workmanship (so that the joint is not showing up badly).
Stop the work preferably in corners, jambs, stoppers or at grooves etc. This will avoid cracks at joints. Do ensure these joints are finished neatly.
Round the edges than to keep sharp 90 degree edges (pencil round namely a small curvature of less than 5mm radius). Similarly at the junction of ceiling to wall, Do round off the junction.
Avoid the following to ensure good plastering quality:
Do not allow mortar mixing on unclean area, with out a platform and in large quantities.
Do not allow usage of partially set mortar.
Do not allow of free sprinkling of dry cement in the mortar or on the surface being plastered, as this may cause uneven shrinkage and lead to development of shrinkage cracks.
Do not mix different bands of cement in same room / same area as this will show color difference (till plastered surface are covered with some other finish).
Do not allow any breaking or chipping open the plastered areas, for laying pipes etc. once plastering is completed.
Discover more from Method Statement Store
Subscribe to get the latest posts sent to your email.