The purpose of this method of statement is to provide general instructions for AAC Block masonry works at a construction project site. This work procedure covers AAC masonry work to be executed in the substructures/super structures of different buildings as specified in the approved drawings.
AAC Concrete blocks (light weight) shall generally conform to local applicable standards. Blocks shall be regular in size & shape and shall be of specified strength & quality. Half or three-quarter size blocks are to be used wherever required to make up length of wall and broken blocks shall not be used.
The texture of the blocks shall be such that plaster will adhere to it. Blocks shall be sound, free from cracks, honeycombing, broken edges and other flaws. Shall have plane rectangular faces with parallel sides and sharp straight angled edges. AAC blocks shall have a fine, compact, uniform texture and thoroughly dried.
Cement and sand shall be confirming to customer civil work specification.
Water used for masonry work shall be clean and free from injurious amount of deleterious materials.
Jointing Mortar: Mortar application as per manufacturer recommendation.
Dimensions and Mix Proportions: 625 x 200/100 x 250 (L X B X H) mm thick Autoclaved Aerated Block masonry with cement mortar 1:6 / Adhesive (jointing mortar) as prescribed as per Manufacture specification.
Masonry Block Work Method Statement – Download Editable Files
Handling and Storage of AAC Blocks
Transporting Light weight blocks in such a manner that the units are adequately protected during transportation. Blocks shall be handled in a manner, which will prevent soiling, chipping or damage of any kind.
Broken, chipped or otherwise damaged block units will be rejected and shall not be used in the work.
The blocks shall be stored in a place, which shall not be disturbed or damage by construction activities.
Sampling Of Blocks
A sample of 24 blocks shall be taken from every consignment of 10000 blocks of the same size, batch and manufacturer for conducting tests as per IS 2185 Part 3 Clause 10.
All 24 blocks shall be checked for dimension and inspected for visual defects.
Out of the 24 blocks, 12 blocks shall be checked for compressive strength, 3 blocks for thermal conductivity, 3 blocks for block density, 3 blocks for test of drying shrinkage.
Remaining three blocks will be kept for test for drying shrinkage in future if the need arises.
Tolerances in AAC Block work
Maximum variation in the dimensions shall be +/- 5% in length and +/- 3% in width and height. The number of blocks with dimensions outside the tolerance limit and or with visual defects, among those inspected, shall not be more than two.
For density, the mean value shall be within the range specified.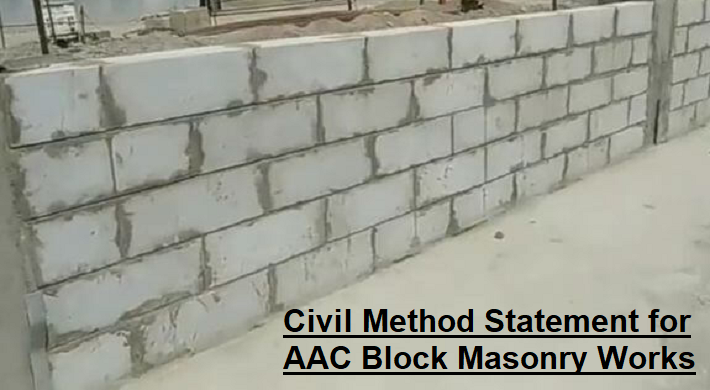
For compressive strength, the mean value, say “X” shall be determined. The test results shall be grouped into groups of 4 and individual values of ranges shall be determined and the average range a calculated from these values and shall satisfy the following condition: X – 0.6 R > minimum value specified.
For thermal conductivity, the mean value shall be equal to or less than the value specified.
For drying shrinkage, all the test specimens shall satisfy the requirements of the test. If one or more specimens fail to satisfy the requirements, the remaining 3 blocks shall be subjected to these tests. All these blocks shall satisfy the requirements.
Preparatory Work for AAC Block Masonry
Mark on the surface to establish the wall lines to attain proper layout of block work & maintain mark till the first course is fully laid.
Scrub & clean with proper tool, Hack the concrete surface where new block work is to be done.
Before commence block work, check reference point such as bench mark, damp proof course level, lintel level, bed block level, cross beam level etc. & be sure where to terminate the top most block course, after the same is studied in detail as stated above.
Mix quantity of mortar, which will be consumed in next 2 hours only. Mixing shall be done with proper measurement of ingredients. Mixing platform must be clean.
These blocks need not be wetted before or during the laying in the walls; in case the climatic condition so required, the top and the sides of the blocks may be slightly moistened so as to prevent absorption of water from the mortar and ensure the development of the required bond with the mortar.
Masonry Block Work Method Statement – Download Editable Files
Laying Block Masonry
Proper hacking shall be done for all concrete surfaces before starting of the job.
Each block shall be set with bedding joints and vertical joints filled thoroughly.
The wall shall be taken up truly plumb. All courses shall be laid truly horizontal and vertical joints truly vertical. Vertical joints in alternate courses shall come directly over the other.
Thickness of the block courses shall be kept uniform.
The base layer of the block work shall be done with cement mortar of mix 1: 6 to align the undulations & to maintain the top-level uniform.
From the second layer, the joint thickness in between blocks and above layers shall be around 3mm with approved make adhesive.
Excess mortar coming out on the edge to be taken by trowel & buttered to the cross directional joint or head joint surface of the next block being laid.
Use straight edge & sprit levels on the top of the blocks laid & check the top level. Make sure that the spirit level is in working condition & read the bubble carefully.
Repeat the above points for building more courses. After every two courses of block work laid, check the verticality & level by plumb bob and level tube, sight down the wall.
Blocks can be easy cut/sawn, drilled, nailed and routed at site using recommended tools. Cutting of blocks can be done by using a handsaw or Sabre saw of BOSCH make (GSA1300) or equivalent. For bigger projects cutting wheel can be mounted on table and blocks are pushed towards wheel for cutting.
Necessary tools comprising of wooden straight edge, mason’s spirit level, square, foot rule, plumb line and pins etc. shall be frequently and fully used by the masons to ensure that the walls are taken up true to plumb line and levels.
All the connecting block masonry work shall be carried out at nearly one level and no portion of work shall be raised more than 1m above the rest of work. Any dislodged block shall be removed and reset in fresh adhesive.
The construction of walls may be started either at the corners first, or started from one end and proceeding in the other direction.
If the corners of the walls are built first, they shall be built four or fine courses higher than the centre of the walls.
As each course is pre-laid at the corner, it shall be checked for alignment, level and for being plumb to ensure truly straight and vertical walls.
Each course in building shall be stepped back by half block and the horizontal spacing of the block shall be checked by placing a mason’s level diagonally across the corners of the block, the mason’s line shall be stretched from corner to corner for each course and the top outside edge of each block shall be laid to this line.
Handling or gripping the block shall be such as to position the block properly with minimum adjustment.
Mortar for AAC Block Wall Construction
The recommended mortar mix for construction (proportion by volume) is 1:1:6 Cement, Lime and Sand or 1:6 Cement, Sand. Preferably use PPC/PSC cement for best results.
Mortar shall not be spread so much ahead of the actual laying of the blocks as it tends to stiffen and lose its plasticity thereby resulting poor adhesion and bond.
Mortar consistency to be maintained at the time of laying block masonry.
Joining of Dissimilar Materials
All the contact surfaces should preferably be separated from those of dissimilar materials like concrete or steel, by filling with a resilient material along the contact area and edges filled with sealant.
Provide chicken/ synthetic mesh firmly over all dissimilar joints of concrete/block masonry prior to plastering.
For external wall joints need to be grouted or properly treated to avoid water ingress and crack formation.
Masonry Block Work Method Statement – Download Editable Files
Horizontal (bedding) & Vertical (Cross) Joints
Adhesive shall be spread over the entire top surface of the block including front and rear shall as well as the webs to a uniform layer of around 3mm thickness.
When filling in the wall between the corners Vertical (cross) joints for vertical joints, adhesive shall be applied on the vertical edges of the front and rear side of the blocks.
The adhesive shall be applied on the edges of the succeeding unit when it is standing vertically and then placing it horizontally well pressed against the previously laid unit so as to provide well compacted vertical joints.
In the case of two cell blocks, depression on either vertical sides shall also be filled with adhesive.
The thickness of both horizontal and vertical joint shall be around 3 mm. Raking & pointing is not required. The face of AAC block masonry shall be kept cleaned and all adhesive droppings to be removed promptly.
All block work shall be plumb, square and properly bonded.
The thickness of the courses shall be uniform with courses horizontal.
All connected work shall be carried out at nearly one level and no portion of the work shall be left more than one course lower than the adjacent work.
Where blocks are to be used for load bearing walls, the uppermost layer of the blocks supporting slab or other structural members, shall be properly packed.
Closure Block Installation: When installing the closure block, all edges of the opening and all four vertical edges of the closure block shall be buttered with adhesive & the closure block shall be carefully lowered into place.
Lintels Construction
Precast or cast in situ concrete shall be used in block masonry, over all openings. Lintels shall always rest on full block with minimum bearing as under.
Nominal Bond Beam
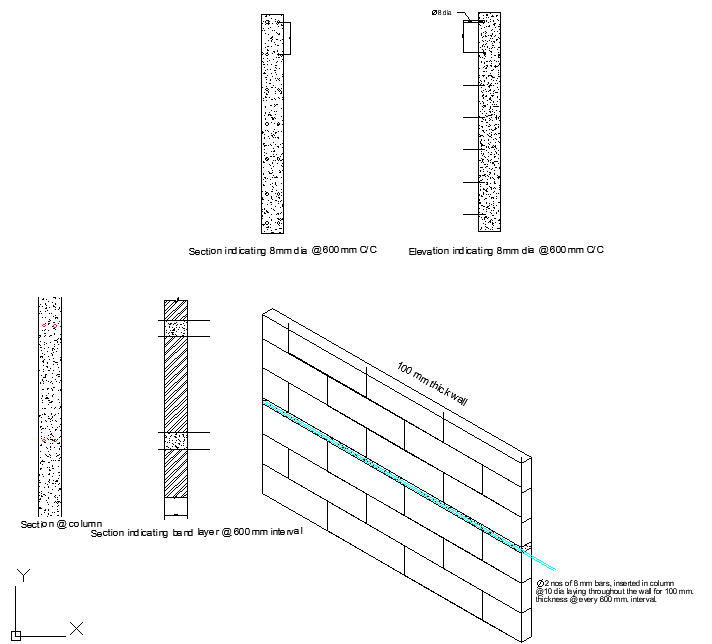
Nominal bond beam shall be built in the manner as the structural bond beams with a minimum Reinforcement 8mm diameter rods shall be inserted into surrounding columns for load transmission as shown in below figure.
Two number of reinforcement shall be inserted integrally with a masonry wall and column with C/C spacing 600 mm for 100mm thick wall and 1200 mm for 200mm thick wall for anchorage.
Their value for this purpose is due to the increased strength and stiffness they provide to a masonry wall. As a means of crack control, the area of influence of a bond beam shall normally be presumed to extend 600 to 1200 mm above and below its location in the wall.
Structural Bond Beam
A reinforced concrete beam built integrally with a masonry wall as a structural member and designed in accordance with structural engineering practice, primarily to transmit lateral loading on the wall to other connecting structural elements.
Reinforcement rods shall be inserted into surrounding columns for load transmission as shown in the figure, two number of 8mm diameter reinforcement shall be inserted integrally with a column with C/C spacing 600 mm and 1200 mm respectively and it will have laid throughout the wall preliminary to transit lateral loading on the wall to other connecting elements for 100 & 200mm thick wall.
Masonry Block Work Method Statement – Download Editable Files
Plastering on Block Walls
The wall shall be moistened evenly before applying the plaster.
A fog spray is recommended for this purpose.
10 mm thick external plastering has to be carried out in one coat, applying SBR coating with sand on block surface will enhance the bonding and minimize thickness of plastering.
It is recommended to use cement mortar 1:6 for internal & 1:4 external plastering works and preferably use PPC/PSC cement for masonry and plastering works to minimize shrinkage cracks plastering thickness can be minimized to 10 mm & 10 mm for internal and external walls respectively.
Precautions to be taken for laying of AAC Block Masonry:
Do not store the blocks on un-levelled surface
Do not use wet blocks for masonry construction
Do not make the holes on block masonry for scaffolding supports
Do not soak the blocks before use
Do not hammer the block masonry for service lines, chases etc.
Do not completely wet the block masonry before plastering works
Do not chase the blocks back to back for lesser thickness blocks.
Blocks should be used when it is in dry condition.
Curing should not be done after Blockwork.
Avoidance of Crack Formation
Structural Movements
Cracks may occur due to alterations in length, curvature or orientation of the structural members enclosing a wall or partition due to load settlement, thermal expansion or changes in moisture content.
The precautions to be taken for prevention shall be as described in below.
In the case of framed structures, erection of partitions and panel walls shall be delayed wherever possible until the frame has taken up, as much as possible, any deformation occurring due to structural movements.
For continuous walls in excess of 6.0 M a 10 mm wide movement joint running through the wall shall be provided starting at 3 M from a corner.
The joint shall be filled with mortar material and the ends shall be sealed to prevent rain water penetration. Provide dummy / stub columns depending on thickness of blocks.
Floor deformation and movement
The floor upon which a partition is built may deflect under load brought upon it after it is built.
Where such deflections tend to create non-continuous bearing, the partition shall be strong enough to span between the points of least floor deflection or shall be capable of adapting itself to the altered conditions of support without cracking.
This may be achieved by embedding wires of minimum 3 mm diameter mild steel or galvanized steel or welded wire fabric strip in bed joints in cement mortar 1: 2 after every 900 mm to 1200 mm height.
Ceiling deflection and movement
A ceiling above a partition wall may deflect under loads applied after its erection, or through thermal or other movements.
To avoid cracking as a result of such deflection, the partition wall shall be separated from the ceiling by a gap or by a layer of resilient material or lean mortar.
Where this cannot be done as in the case of plastered finishes, the risk of cracking may be diminished by forming a cut between the ceiling plaster and the wall plaster.
Deflection or movement of structural abutments
Walls, columns or other structural elements against which a wall or partition abuts may deflect or move because of load, settlement, shrinkage or thermal effects.
In order to avoid cracking of walls or partitions as a result of such movements, a slip joint shall be provided where possible, preferably packed with a resilient material or lean mortar.
Control of Wall Movement Accompanying Temperature and Moisture Changes
Cracking in concrete masonry walls is often due to tensile stresses which develop when wall movements accompanying temperature and moisture change are restrained by other elements of the building, or when concrete masonry places restraint on the movement of adjoining elements.
Control Joints
To reduce restraint by accommodating movement of the masonry wall, or movement of structural elements adjacent to the wall, and thus to control cracking.
They are, in fact, vertical separations built into the wall at locations where cracking is likely due to excessive horizontal stresses.
Spacing along the wall length depends upon the expected movements of the wall and other elements, the resistance of the wall to horizontal tensile stresses, and the extent and location in the wall of doors, windows, recesses, chases and other causes of stress concentration.
Masonry Block Work Method Statement – Download Editable Files
Discover more from Method Statement Store
Subscribe to get the latest posts sent to your email.