The purpose of this honeycomb repair method statement is to define the procedure for the sequence of repairing of concrete defects, considering all safety and quality requirements.
This procedure is written in order to present the method to be used for repairing concrete defects due to minor plastic and drying shrinkage cracks, formworks removal, honeycombs, voids, holes, etc., which may appear in the concrete structures.
It is intended to serve for all concrete repairs on the project and any kind of buildings.
Necessary tools/ Equipment’s
- Steel brushes
- Frameworks materials
- Paint brushes
- Wheel barrow
- Trowels
- Mixing drums and buckets
- Slow speed drill
- Mechanical mixer machine
Recommended concrete honeycomb repair materials
- Corrobond PVA
- Conrep 301 GA
- Conrep 311 MC
- Lanko 701 MCS
- Emaco S23 NB
- Epogrout GP
Corrobond PVA (Corrotech): This multipurpose material can be used both as a straight forward bonding agent for concrete construction joints and repairs, a sealer and/or an admixture in cement based mixes. An adhesive for internal rendering, floor toppings, key plaster, cement screed, etc.
Conrep 301 GA: It is a non-shrink mortar for grouting and concrete repairing which can be used where high compressive strength is required. It is formulated to produce a shrinkage compensating mortar with excellent adhesion. It can be used for thicknesses up to 5cm.
Conrep 311 MC: It is a non-shrink micro concrete for grouting and general void filling. It can be used where high compressive strength is required. It can be applied on sound concrete, masonry or similar material in thickness ranging from 50 to 100 mm per layer.
Lanko 701 MCS: It is formulated for all structural repairs ranges to structural loss in columns and reinstatement of large structural sections of concrete. Resurfacing substrates where high compressive strength and low permeability are required (e.g. piles caps repairs, traffic areas, etc.). It is a free flowing micro concrete suitable for large volume concrete repairs at thicknesses from 50 to 300 mm.
Emaco S23 NB: When mixed with water, it is a flowable micro concrete ideally suited to poured/cast application, typical for large volume repairs, honeycombing and other construction defects to all structural elements. It can be used to a minimum depth of 10mm.
Epogrout GP: Is a three component self-levelling free flowing grout. Used in conditions that has heavy dynamic loads, high bearing strength, or high chemical resistance. It is recommended for grouting gap with of 10-50mm
Above materials can change as per project location and approvals.
Types of Concrete Defects
The repair action depends on the depth and type of defected area; the types of concrete surface defects are classified into the following:
Blowhole
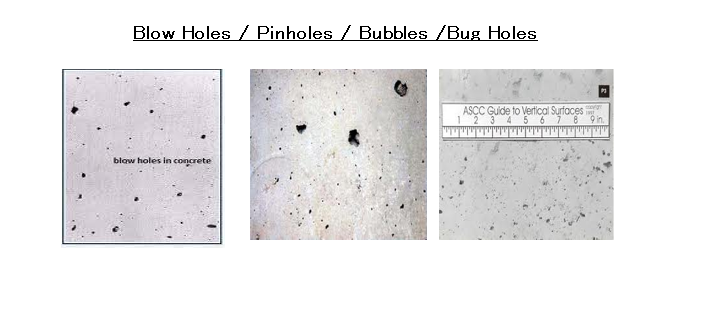
Blowhole (Also sometimes called Pinholes / Bubbles/Bug holes):
Blowhole defects are considered concrete surface defects due to the entrained air bubbles between the concrete and formworks, with an length less or equal to 10mm and a depth not more than 5mm, this type of defect will be repaired where the concrete surface is to be finished without plaster so that it is exposed to view.
In the case of plaster, tiling or block work where hacking of the surface is required the repairs shall not be done.

Honeycombing
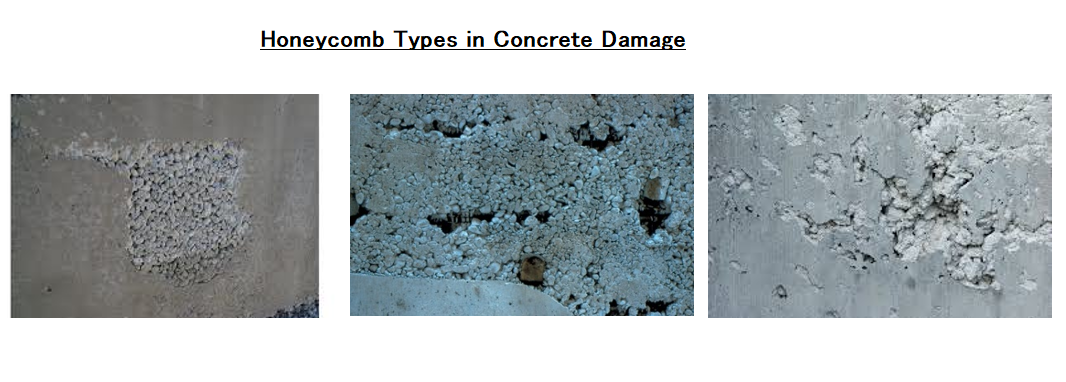
Honeycomb refers to voids left in concrete due to failure of the mortar to effectively fill the spaces among coarse-aggregate particles.
It usually becomes apparent when the formwork is stripped, revealing a rough and ‘stony’ concrete surface with air voids between the coarse aggregate.
Honeycombing is caused either by the compaction not having been adequate to cause the mortar to fill the voids between the coarse aggregate, or by holes and gaps in the formwork allowing some of the mortar to drain out of the concrete.
In some cases, the member shape and detailing/placement of the reinforcement compounds the effect of inadequate compaction.

Cracks: There are three common types of cracks for new concrete.
- The first type take place during formworks removal, the concrete edges are broken, peeled, or cracked during the formwork removal.
- The second type is Plastic cracks which appear in the surface of fresh concrete during its plasticity period and it is usually seen as parallel cracks to each other. The cracks appear generally on the top of wide surfaces like slabs due to rapid water evaporation and plastic settlement of concrete around steel bars and rising of bleeding concrete.
- Third type is random-drying shrinkage cracks, which appear as random cracks in the top surface of concrete due to rapid hardening of concrete in hot weather.
Holes: The surface defects in walls, foundations, columns and beams is not more than 25cm depth or concrete cover.
Void through structure: Defects to all structural elements to a minimum depth of 10mm.
Tie Rod Holes: Strictly speaking holes due to the use of tie rod used in the use of formwork is strictly not a defect of the concrete or concreting, however since the hole caused has to be rectified it is covered in this method statement.
Classification of the Types of Concrete Defects
The QC Engineer shall determine the defect as “minor” or “major”.
- For Minor Defects such as shrinkage cracks, blowholes and minor honeycombs, the QC Engineer shall decide the suitable approved repair material and as per the approved Method Statement, instruction shall be given to the site Engineer to proceed with the repair work.
- For Major Defects such as structural cracks, major honeycombs, deep holes, larger voids, etc. the QC Engineer shall issue an internal NCR to the site Engineer and copies shall be forwarded to PM/CM. Inspection request shall be raised to the Consultant prior to proceeding for the repair works. Approval for the surface preparation shall be obtained from the Consultant prior to application of bonding agent and repair materials. Internal NCR shall be closed upon completion of the work and final approval by the Consultant.
IMPORTANT: All deep surface cracks should be investigated to ensure that the structural integrity of the element is not compromised. In such cases a third party recommendation for the repair can be obtained.
Repairing of Concrete Defects
General Surface Preparation
All surface preparation shall be done as per manufacturer’s recommendation.
In general, the surface shall be sound, clean and free from any loose materials up to sound concrete and the surface must be free from oil, grease and dust.
All prepared areas should be thoroughly soaked with clean water immediately prior to repairing product application; any residual surface water should be removed prior to commencement.
Minor repair for Pinholes, minor surface imperfections and shrinkage cracks
The following procedure describes the remedial action to be taken for repairing the minor defected concrete due for slight honeycomb, pinholes and shrinkage cracks by using the approved material.
- Prior to starting the application, concrete surfaces shall be prepared and shall be thoroughly soaked to ensure a saturated but surface dry condition at the time of application.
- The approved material will be mixed using a slow speed drill fitted with a suitable mortar-mixing paddle. In case of small quantities less than 10kg the mixing will be achieved by hand mixing.
- The mortar shall be applied by using brush, roller, steel float, spatula or trowel to the previously prepared substrate ensuring a maximum thickness of 5mm.
- Where the material is used to fill voids and blowholes the excess shall be scraped off with the edge of the steel trowel.
- Good curing is essential particularly in hot or windy conditions. Curing will be performed with covering the work with properly secured wet Hessian and plastic sheeting.
Honeycomb Repairing Method
The following procedure describes the remedial action to be taken for repairing the defective area due to honeycomb, pocket, and holes left by tie rod or voids in concrete cover.
The preparation of surface will be achieved by cleaning the surface and remove any dust and unsound material.
Roughen the surface to remove any laitance and expose the fine aggregates.
All prepared areas should be treated with bonding agent (prior to starting the application of the repairing product.
Raise the inspection request for the preparation.
The patched mortar consists of approved non shrink grout (see Table 1). Mortar will be applied by trowel into the substrate to ensure high contact with substrata.
Final finishing is to be done by wooden or plastic float.
After setting time of mortar, the curing must be started using the same procedure for the existing concrete as described in below section.
Major repair using formworks
The following procedure describes the remedial action to be taken for repairing the major defected concrete element due to the existing of honeycomb or voids greater than 40 mm deep by using formworks and free flowing mortar.
The defective concrete is to be removed. The edges perpendicular to the concrete surface shall be cut by angle grinder or by chiseling process.
In case of exposed existing steel reinforcement, a minimum distance of 20 mm behind the rebar is required.
Bonding agent is applied and inspection request shall be raised.
Care shall be taken to ensure that the mixture is homogeneous and thoroughly blended as described in the manufacturer data sheet.
The mixed product will be poured on the prepared area continuously to reduce the time between successive batches.
Compaction must be performed by tapping the formwork slightly with a proper hammer.
In case of large-scale repair, the material will be applied at layers with thickness as per mention in data sheet.
The repaired area must be protected from wind by using polyethylene sheet.
Major repair without formworks
The following procedure describes the remedial action to be taken for repairing the defected concrete especially for the overhead repair application due to existing of honeycomb or voids greater than 40mm deep.
Defected concrete to be removed down by hand tools to obtain regular profile with depth not less than 10mm, the concrete surface to be prepared to provide a rough surface.
The unsound concrete particles must be removed by using hand tools, the repaired area to be cleaned by steel brush and blown by air compressor to clean the dust.
Prior to the repairing product application, all areas should be thoroughly saturated with water prior to applying the repairing materials.
Appropriate quantities suitable to the repairing area are mixed by slow speed drill and mortar mixing paddle or by hand using a suitable mixing drum or bucket to obtain homogeneous mixture.
Mixed product will be applied by hand trowel and forced tightly into the pre-wetted substrate to ensure high contact with substrata.
The final finishing to be done by wooden or plastic float.
After the setting time for repairing mortar, the curing must be started using the same procedure for the existing concrete.
Repairing Tie Rod Holes
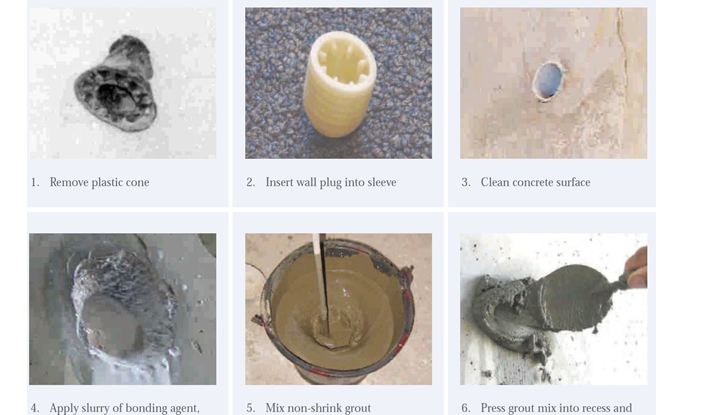
- Remove the PVC cone and the PVC sleeve along with the tie rod.
- Insert a wall plug to prevent the grout to flow over from the other side. This is not required for cases like water tank or retaining wall where a cast-in-tie-rod-connector/ water stop tie rod connector is used.
- Clean the hole of any dust or dirt. And ensure the hole is dry.
- Apply the PVA bonding agent.
- Start mixing by pouring hardener B into base A, the two components must be well mixed to ensure proper chemical reaction.
- Use a slow speed drill fitted with suitable paddle to mix the product at low number of turns (200 – 300 rpm).
- Mix for few minutes till a homogeneous mixture is obtained, then add component C (filler/aggregate) and mix for 2 – 3 minutes until you get a uniform color mixture.
- EPOGROUT GP is supplied in a pre-measured packing.
- Partial mixing should not be allowed under any condition.
- Use a small trowel or a smaller rod shall be used to fill the hole with the non-shrink epoxy grout mortar (Epogrout GP) to its full capacity.

Repair of unformed surface
Surface defect in concrete which don’t comply with the specified tolerance especially in monolithic slabs be repaired as follows:
To an unformed surface in high areas, it will be corrected by using a grinding machine.
To cover the low defected surface, the area is to be cut out and leave the edges perpendicular to the concrete surface by angle grinder or similar to obtain regular profile.
The unsound concrete particles must be removed by using hand tools.
The repaired area must be blown with air compressor to clean the dust.
Prior to product application, all repaired areas should be thoroughly soaked with water.
Bonding slurry mixture consists of approved bonding agent; cement and water will be applied on the pre-wet substrata, prior to application.
Mix patching fresh concrete of same materials to provide concrete of the type.
The material shall be applied continuously. After the completion of repairing, the repaired area must be protected from wind by using polyethylene sheet.
After setting time for repairing material; the curing must be started using the same procedure for the existing concrete.
Selection of Concrete Repair Materials
| S. No. | Type of Repair | Dimensions | Proposed Material | Strength of Material |
|
1 |
Blowhole repair | 0-3mm | Renderoc FC—Fosroc | NA |
|
2 |
Minor Surface imperfections | 0-3mm | Renderoc FC-Fosroc |
NA |
|
3 |
Insufficient Cover and Small repairs | 0-50mm | Conrep 301 GA |
60 N/mm2 |
|
4 |
Tie Rod Holes | 10-50mm | Epogrout GP |
60 N/mm2 |
|
5 |
Medium Honeycomb | 50-100mm | Conrep 311 MC(with Corrobond bonding agent if required) |
60 N/mm2 |
| 6 | Honeycomb to rear of rebar | 50-300mm | Lanko 701 MCS (with Corrobond bonding agent) |
60 N/mm2 |
Concrete Repair Curing Method
The repaired area must be protected from premature drying in hot, dry and windy weather, so that the curing process to be started as soon as possible after formwork removal.
Repaired area will be cured by placing wet Hessian cloth (burlap) and cover over with polythene sheet or by water ponding on the surface and comply with specification
Discover more from Method Statement Store
Subscribe to get the latest posts sent to your email.