
The purpose of this method is to provide guidance for assessing the installation activities for underground HDPE piping systems including but not limited to excavation & joining methods to ensure compliance with the projects standards, consultant recommendations, applicable standards & legal requirements.
Scope of work for this method statement includes handling, storage, delivery, installation instructions to be followed during the manufacturing of underground piping systems for the project.
Necessary Equipment’s:
Joining Machines (Butt fusion – saddle heater – Electro fusion) all complying with the specifications, standards & safety plan.
Grinders fitted with guards & plugged cable ends.
Drillers with plugged cable ends.
Hand tools (Wrenches – Screws – Hammers ) of required size as per application.
Lifting tools (Ratchets – Chain blocks – Hydraulic jacks) of appropriate calibrated capacities.
Roles & Responsibilities:
The following site personnel shall be involved and responsible for the HDPE piping installation & joining works:
Project Manager:
- Overall implementation and monitoring of construction works in accordance with procedures, specifications and construction drawings
- Define Work Breakdown Structure
- Develop Time Schedule and/or Progress Monitoring
- Manage materials and tools availability at work site in time
- Check quality and condition of received materials
- Co-ordination between work teams and members
- Following up execution of work according to work Plans, Strategy and Instructions
- Revision to ensure correct application of technical specifications and requirements
- Receipt the completed works, test witness and issue work’s quality approval
- Gives safety and environment protection awareness and Monitor application of safety and environment requirement application
- Jobs delivery to the customer
Construction Manager / Site Engineer:
- Manage works direction execution
- Grant safe operation at site
- Implement works as per project time plan
- Directly control and give instruction to labors
- Ensure usage of proper, sound and safe tools and equipment at site
- Enforce the workers to use the personnel protective equipment and maintain safe work place
- Control availability of materials and equipment at site warehouse in due time.
Handling & Storage of Pipes & Fittings
Straight pipes & spools shall be requested, received, handled & stored close to the installation location.
All pipe storage locations shall be on suitably firm, level ground free from damaging material & with adequate accesses for construction vehicles & lifting equipment’s.
Dragging, dropping, or hitting pipe on the ground or other objects may cause damage.
Inspect all pipe and material before installation.
When stacking non-palletized pipe, some form of stop blocks should be used when starting bottom layer to avoid collapse.
Pipe stockpiles should not exceed 5 feet in height and should not be walked or climbed upon.
Sequence of Work for HDPE Pipe Installation
All project documents & drawings shall be verified & ensured for construction approval prior to execution of work.
Joining method will be for the following types of materials:
Butt Fusion for pipe ends.
Socket Fusion for fittings to pipes fusion.
Flanged Connection for valves installation
Transition fittings for joining HDPE pipes to other pipes materials (black steel or PVC).
Butt Fusion
Butt fusion is a process of welding HDPE pipes and fittings using an electrically heated plate.
It is suitable for jointing HDPE pipes of sizes from OD 110mm and above.
However, only pipes and fittings of the same material type, size and rating shall be butt welded, eg. PE 100 pipes should not currently be welded to PE 80 pipes. PN 10 pipe should not be welded to PN 6 pipe or fitting.
Butt fusion welding is dependent on the temperature and pressure values applied by the welding machine which is specified by the welding machine manufacturer.
Procedures for Manual Butt Fusion Welding
Ensure the pipe ends are clean and if necessary, wash with clean water and dry it.
Cut the pipe ends square and clamp securely in the B/F machine.
Align and level the pipes with pipe supports.
To prevent cooling of the heater plate, blank off the free pipe ends.
Trim the pipe ends until a continuous shaving is seen from each pipe end.
Remove loose shavings and do not touch the prepared pipe ends.
Close the clamps and check for good alignment of the pipe ends, the allowable mismatch is; for 90-315 mm pipe 1mm/355-630 mm pipe 2mm.
Re-trim if mismatch is greater than above values.
Open and close the clamps, noting the gauge pressure to close the clamps-This is the drag pressure. The fusion pressure is obtained by adding the drag pressure to the hydraulic ram pressure given on the machine data plate.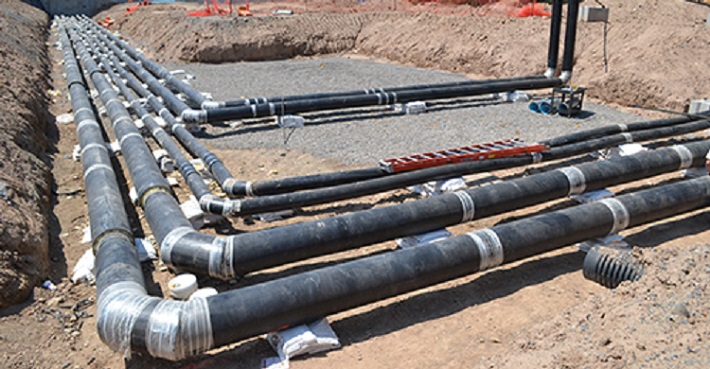

Place the heater plate in the machine, check if it is clean and undamaged, and heat up to 225-240 C.
Close the clamps and apply the previously determined pressure until a bead of 2- 3mm is formed.
Reduce the pressure in the system to between 0 and drag pressure.
While the heat soak time commences, ensure the pipes maintain contact with the heater plate.
Upon completion of the heat soak time, remove the heater plate and close the clamps immediately.
Maintain the required fusion pressure for the specified cooling period.
Remove the joint & allow to cool for a certain period.
Check the joint is free from any contamination, and check the bead widths meet the specified limits and are uniform.
Twist the pipe in several positions, if the bead splits at any position the joint should be cut and redone.
End to End pipes and Fittings to Pipe joining
Use Butt Fusion technique for joining individual lengths of pipe by heat fusion of the pipe butt ends where it is done by applying the following steps:
- Securely fasten the components to be joined.
- Face the pipe ends.
- Align the pipe profile.
- Melt the pipe interfaces.
- Join the two profiles together.
- Hold under pressure.
Saddle to Sidewall joining
Use Saddle fusion technique which consists of simultaneously heating both the external surface of the pipe and the matching surface of the “saddle” type fitting with concave and convex shaped heating tools until both surfaces reach proper fusion temperature.
Apply the following steps to create saddle joint:
- Clean the pipe
- Install heater saddle adapters
- Install the saddle fusion machine on the pipe
- Prepare the surfaces of the pipe and fitting
- Align the parts
- Heat both the pipe and the saddle fitting
- Press and hold the parts together
- Cool the joint and remove the fusion machine
Electro fusion Joining
Use this technique of heat fusion joining for suspended piping & where space & pipe movement is limited due to the small size of fusion equipment where the electro fusion joint is heated internally by a wire coil at the interface of the joint.
Steps to be followed when performing electro fusion joining are:
- Prepare the pipe
- Clamp the fitting and pipe(s)
- Apply the electric current
- Cool and remove the clamps
Valves or dissimilar materials to Pipes joining
Use butt fusion flanges adapters or stub end when joining to metal or to certain other piping materials such as valves or if a pipe section capable of disassembly is required, polyethylene flange adapters are available. The procedures would be:
- Slip the metal ring onto the plastic pipe section, far enough away from the end to not interfere with operation of the butt fusion equipment.
- If a stub end is used, first butt-fuse short length of plastic pipe to the pipe end of the stub end. If a “flange adapter” is used, the plastic pipe-sized end is usually long enough that this step is unnecessary.
- Butt fuse the flange adapter to the plastic pipe segment.
- Position the flanged face of the adapter at the position required so that the back up ring previously placed on the plastic pipe segment can be attached to the metal flange.
- Install and tighten the flange bolts in an alternating pattern normally used with flange type connections, drawing the metal and plastic flange face evenly and flat. Do not use the flanges to draw the two sections of pipe together.
Joining Dissimilar Materials
Use transition fittings as an alternative for joining of plastic to metal. These transition fittings are normally pull-out resistant and seal tight with pressure and tensile values greater than that of the plastic pipe part of a system.
They are commonly available with a short segment of plastic pipe for joining to the plastic pipe section. The metal end is available with a bevel, for butt-welding, with male pipe threads, or is grooved for a Victaulic style or flanged for connecting to an ANSI 150-pound flanged.
Trench excavations & Backfilling
The width of trench should be decided based on the width of pipe being installed where 6-8 inches on either side of pipe is the minimum space acceptable for trench width. The depth of the trench should allow for the proper cover to be added during the backfill process.
Bedding & Haunching
The floor of the trench must be made suitable for proper installation. Pipe should have a firm bedding no less than 4 inches deep, up to 6 inches in cases where rock or other coarse material is present. Uniform placement and compaction of bedding allows for equal load distribution of pipe and protruding features of pipe connections.
Haunching is the most important layer of backfill that is put into place. The haunching should be worked in and compacted around the curvature of the bottom half of the pipe before the rest of backfill is placed.
Material used in the haunching zone should be the same, or very similar to material used in the bedding zone to maintain side support of the envelope.
Initial & Final Backfill
The initial backfill begins at the springline (The springline height is half of the OD of the pipe) and extends to a minimum of 6 inches above the top of the pipe.
It is very important not to use compaction equipment directly over pipe while placing initial backfill.
The final backfill is not quite as crucial as the envelope around the pipe, but it is still important to keep a good level of compaction to prevent rutting at the top of trench. The final backfill extends from the initial backfill to the surface and should be a minimum of 6 inches deep.
Recommended minimum height of cover for 4 – 48 inch diameter pipe is 12 inches in a typical trench installation.
Height of cover in flexible pavement applications (asphalt) is measured from top of pipe to the bottom of flexible pavement.
In a rigid pavement application (concrete), height of cover is measured from top of pipe to the top of the rigid pavement application.
The excavated material from digging the trench may be used for the final backfill stage, unless otherwise required.
Compaction
Very little compaction required for crushed stone. So hand-held or walk behind compaction equipment is recommended to eliminate any damage to the pipe and will ensure proper compaction density.