

This civil construction method statement provides the control sequence in construction and methodology procedure which details the post tension activities of the post tensioned slab as per approved shop drawings.
Following materials and tools to be provided for performing the post tension slab activities:
- Strands
- Galvanized Flat Ducts
- Anchor Blocks
- Stressing Blocks
- Wedges
- Denzo tape
- Duct tape
- Grout vent tube
- Stressing Pump
- Stressing Jack
- Grout Machine
- Hacksaw
- Steel fixer’s nips.
- Disc cutter.
- Re-chargeable drill machine
- Adjustable spanner
- Staple gun
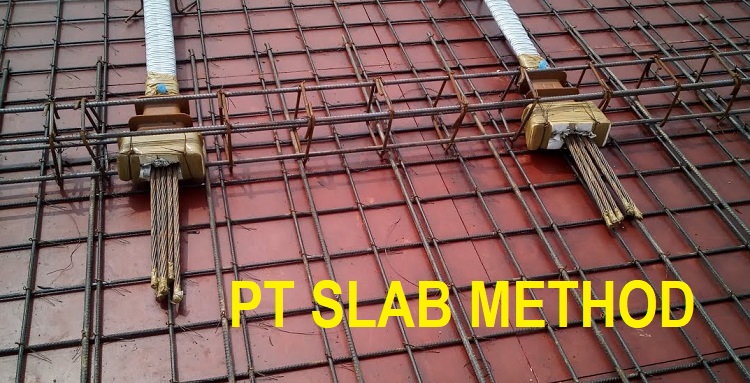
Post Tension Slab System Installation
Most importantly plan your slab work before receipt of the material delivery. The delivery must be located on or near the deck as agreed with the builder/supplier.
Take into account the location and placement of plant and materials and ensure that the support platform is capable of taking the weight.
It is important to place coils of strand over formwork supports. If necessary place additional timber supports at these locations to spread the load. When placing strand on concrete slabs ensure that the slab has been back propped where required, and is not overloaded with excessive material storage. Check this with the main contractor/client, who should arrange to check this through the structural engineer.
Better to locate the material in a location that is on benefit to the installation of the deck without the stand impeding access ways.
- Mark out anchor locations on edge boards showing heights of slot and bolt hole required to be cut and drilled. Record any discrepancies between the shop drawing and actual deck dimensions, and report to supervisor, or project engineer to update the as built records.
- Where top stressing pockets are required, position and tie in at correct height.
Bolt anchors and recess forgers to edge board/pans.
Lay out ducting from anchor and tape joins firmly.
Set-up strand and record coil identification numbers.
Measure length of tendon, pull out strand and cut to length. (allow enough length for stressing approximately 400mm)
Push strands into duct, checking shop drawing for number in each tendon.
For single end stressed tendons:
- Onion head each strand at the non-anchor end.
- Position dead-end and chair up to correct height.
Fit bar chairs of reinforcing bar supports under full length of tendon at locations as per the shop drawing and tie in place, checking for minimum cover to all surfaces.
Staple feet of bar chairs to formwork soffit where applicable. Do not use staple gun as a lever.
Fit grout tube to all anchors and dead ends. If tendon length exceeds 40m internal tube may be required at high points.
Seal duct to anchor connection, and termination of duct at dead-ends to prevent concrete and slurry ingress.
Check all strands and tendons for alignment and completion.
Make any adjustments or rectification’s requested by the Consulting Engineer after inspection.
PT Slab System Stressing
INITIAL STRESS
- Remove recess formers.
- Place “banana” stressing block or barrels on all strands in each tendon (balance the strands evenly for tendons with less than 5 strands). Make sure banana block is seated correctly. Check banana block for dags.
- Check wedges for foreign matter. Fit 2 piece wedges around strands in block.
- Check with builder’s representative that concrete strength has reached required strength.
- Stress all strands in each tendon to initial percentage of design load.
- “Knock-off” i.e.: drive home wedges before releasing jack pressure (or use automatic “knock- off” nose with jack) making sure the spring is sitting correctly.
- Prior to initial stress, spray or mark paints all strands at a given point.
- Make sure that wedges have seated properly after initial stress.
FINAL STRESS
- Confirm with builder’s representative that concrete strength has reached required strength.
- Check shop drawing for any specified stressing sequence to be followed, and jacking force to be used.
- Stress every strand in each tendon to full design load.
- “Knock-off” wedges before releasing jack pressure (or use automatic “knock-off” nose with jack).
- When all strands are stressed, measure distance between wedges and paint mark and enter value on record sheet, within an accuracy of 1mm.
- Transmit records to the Project Engineer as soon as possible for checking and formal submission for approval.
Cutting of strands and sealing of recess
Before cutting of strands, check
- That all strands have been stressed to required load, and the extension records have been submitted to the Project Engineer.
- That approval to cut all strands has been received in writing
Use the grinder to cut back the exposed strands so as to gibe minimum of 25mm cover to the external concrete face.
Make up a dry pack mixture in the following proportions:
-
- 3 parts sand
- 1 part cement
- 1 part liquid
NOTE: The amount of water added may vary depending on the condition of the sand to be mixed, (it may be very dry or wet).
As a general rule:
- Very dry sand – mix to proportions above
- Very wet sand – add only relpatch (ie. no water)
Texture of dry mix must be mouldable in the hand.
Once the dry pack has been thoroughly mixed, begin filling the pocket by tightly packing the mix around the exposed anchor and strand. Packing of dry pack is initially with the hand around block and wedges and then by using timber to pound the pack tight.
Ensure all excess dry pack and strand off-cuts are cleaned up and deposited at rubbish removal location.
Once all cables have been cut and sealed and the dry pack has cured the slab is ready to be grouted.
GROUTING TENDONS
Grout mix details
- OPC Cement Quantity: 100kg
- Water Cement Ration: 0.38:1
- Additive if Required
- Recommended flow cable or Cebex Cable Grout
Grout mixing and injection process for post tension slab
Prepare all necessary materials and equipment.
Check all anchors are cut and sealed.
Using air, check all grout tubes and ducts for blockages, and clear blockages.
Check pump/mixer is in working order and hoses clear.
Check cement is fresh (i.e… not lumpy).
Recycle water in pump/mixer.
Add additive.
Mix and recycle for 2 minutes.
Add cement slowly, 1 bag at a time, until consistent mix is obtained.
Continue to add cement until 200kg has been mixed, (recycling mix at all times).ok
Tidy up all cement bags and dispose of correctly.
Position bucket at far end bleed tube. (To catch excess grout).
Connect grout hose to near tube and start pumping.
Allow ‘1 No. can’ good quality grout to come from end tube before bending tube over and closing off using tie wire.
STOP PUMPING, and close off near tube.
Repeat steps 13 to 17 for all tendons until deck/pour complete.
When complete, pump excess grout to waste area agreed with builder.
Wash and clean down mixer and flush hoses until clean.
Store equipment in secure, safe location.
On the day following completion of grouting, all tubes to be cut off flush with concrete, and deposited in rubbish area.