
Purpose of this mechanical procedure is to define the sequence and methodology for all critical installation activity pertaining to HVAC air distribution system i.e. ductworks for any kind of construction project building with contract scope of work, applicable standards and drawings.
The scope of work includes AC units with chilled water piping connected with ductworks, grills, diffusers, dampers, duct heaters, drain piping and exhaust fans with associated ducting.
Application / installation procedures described below are based on the preliminary information available during the preparation of this document.
In case of any change in any product, scope of work or specification at a later stage, necessary updating to be carried out relevant sections of this method statement with reference to corresponding manufacturer instructions.
This HVAC method statement covers all the critical installation activities of hvac ducting system including equipment and accessories within the scope of project work.
Abbreviations & Descriptions
| AFC | Approved For Construction | VCD | Volume Control Damper |
| FD | Fire Damper | PPE | Personal Protective Equipment |
| AHU | Air Handling Unit | MSDS | Material Safety Data Sheet |
| ITP | Inspection and Testing Plan | HSE | Health Safety and Environment |
| AC | Air Conditioner | QA | Quality Assurance |
| HVAC | Heating Ventilation and Air-conditioning | QC | Quality Control |
| MSDS | Material Safety Data Sheets |
Tools and Equipment’s
Common tools required to carry out this project are ladders, drill machines, grinders and general tool box that contains Hammer, Duct sealant gun, Measuring Tape, Nylon Rope, Rivet gun, Spanner set, Screw Drivers, Spirit Level Indicators, Markers, Scissors, Grip Plier etc.
Other tools not referred here may be indicated under appropriate section of this document.
Material Handling & Storage
All construction material specification together with the relevant certificates shall be submitted to client/consultant for approval prior to proceed with the material order.
Need to identify a safe and clean designated storage shelter if the material needs to be stored at site prior to installation on its final location.
Material need to be properly stacked on pallets and preserved as per the manufacturer instructions.
Check, manufacturer protection is sufficient enough for the storage and transportation and if required, provide additional protection.
Ensure the protection is not disturbed until the material opened for inspection / installation.
Any flammable material and chemicals shall be stored as instructed by Material Safety Data Sheets.
Material safety data sheet (MSDS) shall be kept at easily accessible location of the storage spaces containing chemical solvents, powders etc.
All the material shall be preserved based on the manufacturer recommendation.
Material inspection shall be carried out by QC personnel and then by consultant.
All the material inspections shall take place against purchase order, drawings, Data sheet, any other reference documents and specifications.
Defective & nonconforming materials will be stored separately in designated areas. These materials shall be immediately replaced or repaired/disposed by respective department as per the instruction provided by procurement division.
Site management shall decide temporary material storage area and control the safe accessible route to the storage area for entry / exit.
Storage area shall be barricaded and labeled properly. Entry into this area shall be restricted to authorized persons only.
Critical material handling activity shall be done in presence of safety officer and the concerned supervisor.
No material is released for fabrication/installation or into storage facility until all the required inspections/tests are completed and the certificates/test reports applicable/required are reviewed and accepted by all parties
Roles and Responsibilities
This project’s fulltime key roles and responsibilities are indicated in below section.
There are many other important positions directly or indirectly involved in this project may not be appearing in the list below.
Project Manager
Project manager responsibilities pertaining to projects are:
- Collaboration with Division Manager and stakeholders, effectively communicate project deliverables & objectives to team members and stakeholders in a timely and clear, Liaise with project stakeholders on an on-going basis.
- Arrange meetings internally and with client/consultant representatives.
- Manage, update and distribute project scope of work and project documents as relevant.
- Liaise closely with functional department in-charges to ensure all aspects of the project are controlled and executed in a safe and timely manner.
- Identify and resolve issues and conflicts within the project team, determine the frequency and content of status reports from the project team, analyze results and troubleshoot problem areas, proactively manage changes in project scope, identify potential crises, devise contingency plans and approval of all project documents.
- Liaise with client/consultant for day to day business related to the execution of relevant scope of work.
- Where required, negotiate with other department managers for the acquisition of required personnel from within the company, delegate tasks and responsibilities to appropriate personnel.
Project/Site Engineer
Project engineers are responsible for directing and managing all activities associated with the project from initiation to close out. He is directly reporting and discussing the project plans, issues, progress etc. with Project manager. His responsibilities includes but not limited to:
- Review, monitor and control project progress and schedule with planning, monitoring and control team.
- Hold regular progress status review meetings with Client and project personnel.
- Promote QHSE at all activities of projects.
- Review, monitor and control project costs and variation with the help of commercial department.
- Follow up and updating the construction schedule to the project manager.
- To follow up and update the status of material availability and status of material procurement.
- Manage all authority requirement and approval required at site.
- To manage supervisors/foreman by giving target and monitor the performance.
- Verify as built drawing provided by supervisor/foreman in site, send to engineering upon verification for the final documentation.
Site Supervisor / Foreman
Supervisor shall be directly responsible for scheduling day-to-day activities on the site related to his trade. Additionally:
- He ensures that the work is executed as per project specifications and project quality requirements.
- Follow up and updating the construction schedule and report to the project engineer.
- Supervisor is responsible for managing their work together with the other discipline teams and supporting project engineer to ensure that the project is delivered on time with the approved quality standards.
- Update the status of material availability to project engineer.
- Responsible for resolving any quality issues raised during QC site inspections and assists Quality Control department to ensure the timely closeout of the comments raised.
- To make sure the maintenance access on the installation as per site condition requirement.
- Prepare as built drawing as per installation and submit to project engineer for verification.
QA/QC Engineer
QA/QC personal shall be directly responsible to ensure the proper implementation on project quality system and monitor that the overall quality of the work is maintained.
Conducts inspection and monitor tests, determines and reports any non-conformance and recommends corrective actions.
Ensures that all personnel are aware of the quality requirement.
Make sure that the necessary training for operatives is provided as and when required.
Ensuring the work is executed according to the contract specifications and project documents.
Implementing and complying the installation works with quality plans and procedures.
Provide necessary instructions to supervisor of any specific requirements related to the work quality and all inspections and tests required to be conducted at every stage of work and prior to proceed on to next stage.
Arranges internal inspections and raising the inspection request for consultant approval for materials, ducts, equipment and accessories installation works.
Health & Safety Advisor/ Officer
Safety officers shall be responsible for HSE requirement and procedures implementation.
Ensuring the usage of proper tools and equipment to maintain safety and periodically verifies certifications of equipment and their adherence to safety regulations.
Reporting of any unsafe work or stopping work that does not comply with project HSE plan and procedures.
Advise for complying with the health & safety requirements and monitor the Hazard controls implemented on site based on Risk assessment.
Ensure that LUX levels are monitored to ensure that sufficient lighting is being provided at work site.
Makes sure the availability of adequate ventilation in the work area.
Ensure proper housekeeping at every shift change or end of day in the work area.
Plan and inform regarding the heavy lifts, radiography, pressure tests etc. to the workforce well in advance to provide a safe working atmosphere.
Ensure that necessary precautionary measures are implemented at the planning stage of any night shift activities.
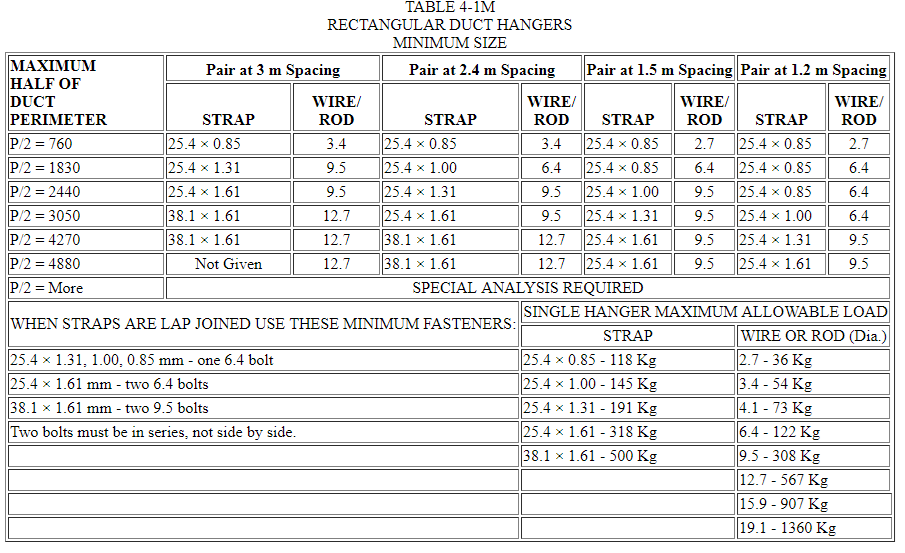
Duct Work Installation Methodology
Support shall be fabricated and installed with proper guidance and manufactures recommendation.
All the accessories and fitting shall be used as per the SMACNA standard and project requirement.
Duct support shall be installed as per the details in approved ducting layout and manufacture recommendation.
All material shall be inspected and verified prior to install.
Material shall be free from physical damage, impurities and proper cleaning to be done.
Mark the location of support as per the approved drawing.
Install the fabricated support as per the approved layout.
Distance between hangers shall be as per approved drawing based on SMACNA standard.

All duct receiving inspection shall be completed as per approved drawing and specification.
Ductwork, fittings and equipment shall be cleaned before erection on site to ensure proper cleanliness.
All manufacturer protective covers on equipment shall be left in place as long as possible during erection.
Open ends of HVAC ductwork shall be covered with dust blind to avoid construction debris deposit.
All ductwork thickness, dimensions and reinforcement shall be verified as per standard, Scope of work and approved drawing.
Provide acoustic insulation to prevent noise transmission and improve comfort where applicable/required.
Duct Installation on Supports
Install the fabricated ducts on the supports as per the approved layout.
Duct shall be connected to equipment by using flexible connection.
Joint the duct by proper method (Ex: G clamp, cleat and nut bolt) and proper gaskets.
Duct seams shall be sealed with proper sealant.
All joints and seams in ductwork and casing are to be thoroughly sealed to prevent air leakage.
Flexible duct shall not be assembled to obtain longer runs.
Duct Accessories Installations
Install all inline accessories including all dampers (Fire Dampers, Volume Control Dampers, Pressure relief dampers etc.) heaters, sound attenuator as per the approved shop drawings and manufacturer’s instructions.
Ensure that the ductwork and damper flange are carefully matched, with the specified sealing material used during installation.
Check damper for damage caused by mishandling or poor transportation.
Visually inspect the integrity of the dampers: blades, frames, corner brackets, interconnecting blade linkages, bearings and pivots, operational drives or quadrants and blade seals.
Check the blade operation by opening and closing the blade(s) via the manually operated quadrant drive spindle/shaft. Clamps, pliers or other mechanical attachments may be required.
Heating elements shall be installed on removable terminal plate to permit easy withdrawal for inspection, duct cleaning and replacing.
An isolator and hazard warning sign, which clearly indicates the operating voltage, shall be fitted immediately adjacent to the heater access opening.
The heating coil shall be clearly marked with an arrow to indicate direction of airflow and another arrow to indicate mounting position.
Ensure that all devices are installed with airflows and pressures conforming to the test data as detailed in the design documents.
All installations must be carried out in accordance with the relevant specifications and AFC drawing requirements.
Supports shall be verified according to the detail drawings and specification.
Apply approved gasket to mating flanges and position damper.
Bolt damper using manufacturer instructed sizes of fasteners.
The damper must be installed square and true.
Any distortion of the casing may cause jamming during operation.
Wherever the damper and heater are installed above a ceiling or any location, an inspection/access hatch shall be provided for the accessibility for tests, service and/or maintenance.
On wall and floor crossing, damper shall be installed by using sleeve.
Installation of HVAC Duct Insulation
Clean the area of duct to be insulated to make it dust free, apply thinner / cleaner wherever necessary to make the area grease free.
Proper inspection to be completed on duct. Joint, routing, all inline items installation to be verified and confirmed.
Duct leak test to be completed if it required.
Install insulation fastener on the duct surface using approved adhesive. Allow 8 to 10 hours for the adhesive to cure.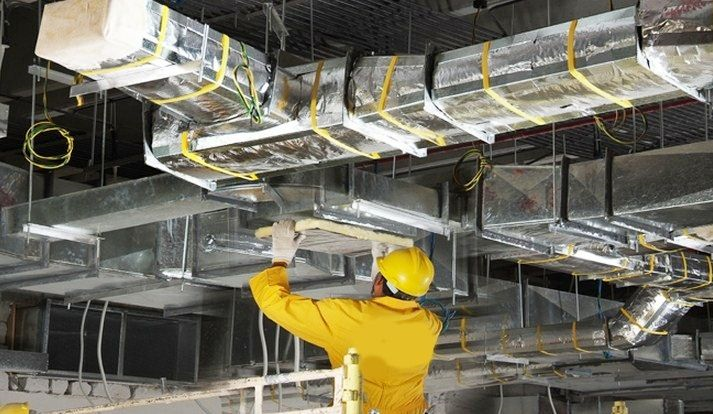

Distance between fastener to be maintained as per drawing and manufacturer recommendation.
Install approved type insulation with aluminium foil finish for rectangular ducts.
Secure the insulation slabs with self-locking washers.
Trim all projecting pins flush with the insulation.
Seal all the joints & visible sections of insulation with aluminium foil tape.
Using the proper clothing and foster, finishing coat shall be done if required.
After foster application allow the duct get dry as per manufacturer recommendation.
Install Grills, Diffusers, registers and Louvers as per the approved shop drawings and manufacturer’s instructions up on the clearance.
Ensure access doors are provided where ever necessary as per the approved drawings
Cladding of Weather Exposed Air Ducts
If cladding is to be installed covering the duct insulation, instead of securing the insulation with pins/washers which might cause lumps / impressions on the cladding sheets, the insulation slabs shall be adhered on to the duct surface using approved adhesive.
Install corner angles covering the corners of duct insulation as per approved drawing.
Secure the corner angles with aluminium foil tape at regular intervals.
Fabricate & install cladding sheet of approved material and thickness covering the insulated ducts (weather-exposed) and secure with rivets.
Flow direction shall be marked on the duct as per approved drawing.